Posts Tagged ‘PInvoke’

Boolean Fields in a Struct: Another Complex PInvoke Construct

Adjacent Boolean fields in a structure constitute a problem in marshaling a C++ struct to C# .Net. Point is that the memory layout of structs is maintained in marshalling. Using the MarshalAs function or the StructLayout Pack field doesn’t solve the problem. Sharing of the bool aggregation memory word by several Properties, in combination with bit-masks and a bitwise operator, does however do resolve the situation.

Introduction

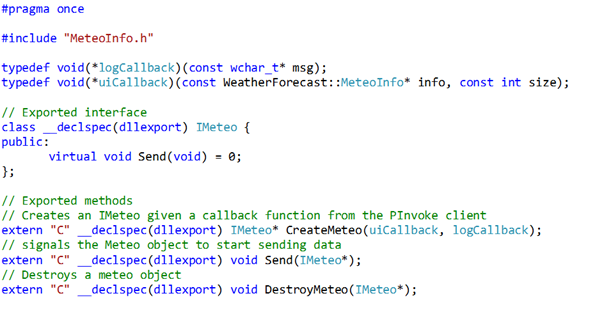
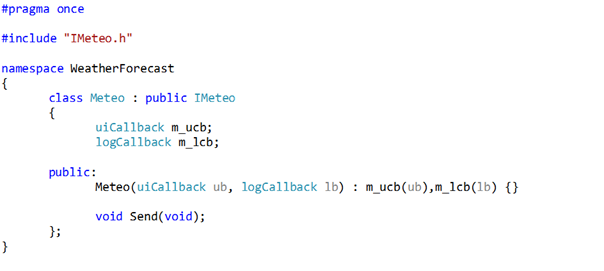
In the previous blog post we saw how to use PInvoke to copy an array of structs from C++ to C#, using a callback. In this blog post we build on the code developed in that previous post to solve a problem in working with Boolean fields (fields of type bool).

I know, it should be easy. However, it is complicated.

Point is: if we extend our structure with a single Boolean field, marshaling works fine, but if we add two adjacent Boolean fields, marshaling breaks down. Why?

Let’s first see what happens, then analyze the problem , and with the analysis in hand evaluate solution alternatives. And yes, the problem will be solved.

Adding Boolean Fields to a Struct, Then Marshal it in PInvoke

Assume we would like to extend our C++ MeteoInfo (meteorological Information) struct with a Boolean field indicating whether it is raining (whether there is precipitation) at the meteo station at time of measurement. In C++ we get:

struct MeteoInfo
{
    wchar_t* DisplayName;
    wchar_t* UniqueID;
    int Temp;
    bool IsRaining;
    double Humidity;
};

In our WPF C# GUI we would meet that with:

public struct MMeteoInfo
{
// Properties, not fields to serve data binding
    public string DisplayName { get; private set; }
    public string UniqueID { get; private set; }
    public int Temp { get; private set; }
    public bool IsRaining { get; private set; }
    public double Humidity { get; private set; }
}


And this will work.

Then, encouraged by our success, we add two more, but adjacent Boolean fields: IsOperational and IsOnline, which indicate whether the meteo station is known to function properly, and can be reached by internet, respectively. In C++:

struct MeteoInfo
{
    wchar_t* DisplayName;
    wchar_t* UniqueID;
    bool IsOperational;
    bool IsOnline;
    int Temp;
    bool IsRaining;
    double Humidity;
};

And in C#:

public struct MMeteoInfo
{
// Properties, not fields to serve data binding
    public string DisplayName { get; private set; }
    public string UniqueID { get; private set; }
    public bool IsOperational { get; private set; }
    public bool IsOnline { get; private set; }
    public int Temp { get; private set; }
    public bool IsRaining { get; private set; }
    public double Humidity { get; private set; }
}

But now we are in trouble. We create an array of MeteoInfos as:

MeteoInfo m_infos[] =
{
    { L"Meteo1", L"123-123-123", true, true, 25, true, 60.3 },
    { L"Meteo2", L"456-456-456", true, false, 27, false, 81.25 },
    { L"Meteo3", L"789-789-789", false, true, 33, true, 36.7 }
};

And it shows up in the GUI like:

Which is completely wrong!

So, what happened?

Analysis: Struct Memory Layout

From an issue posted a connect.microsoft.com (MS’s feedback site). We learn that:

  • In Marshaling a type with layout from C++, default alignment/padding of types is the same as in C++.
  • Alignment requirement is by default 8 but can be changed using the Pack field on the StructLayoutAttribute.

To complete the picture we should add that:

  • The (minimum) byte size of the bool type has not been defined in C++, so it is implementation dependent. In VC++ sizeof(bool)=1, as it is in C#.

Now let’s take a look at the memory layout of the structure in C++, hence in C# .Net, and compare this with the layout we would expect in C# based on aligned type byte sizes.

Field Byte offset in C++, C# Type Size CLR Aligned type size based offset
DisplayName 0 8 0
UniqueID 8 8 8
Temp 16 4 16
IsRaining 20 1 (padding=3) 20
Humidity 24 8 24
One Past End of struct (size) 32 32 32

So indeed, no problems in sight; the actual offset are equal to the offsets based on aligned managed type sizes.

How did I get these data? The C++ structure memory layout can be read off the Memory window while debugging in VS2013. However, in order to obtain the offset numbers for the C# struct (MMeteoInfo) you have to use a trick, see here: assign each field of a struct object to a suitably typed variable (i.e. var 🙂 ), and evaluate the offset of the source value. (I’m open to suggestions on utilities that show memory layout of complex types in managed memory, how ever volatile.)

When we add two (or more) adjacent Boolean fields, we are in trouble

Field Byte offset in C++, C# Type Size CLR Aligned type size based offset
DisplayName 0 8 0
UniqueID 8 8 8
IsOperational 16 1 16
IsOnline 17 1 20
Temp 20 (aligned at word) 4 24
IsRaining 24 1 28
Humidity 32 (aligned at 8 multiple) 8 32
One Past End of struct(size) 40 40 40

This shows that the two adjacent Boolean fields are packed together in a single word. This is the doing of default marshaling, but clearly the CLR cannot adapt to this.

We can explain, or predict the errors now:

  • An assignment of IsOperational grabs four bytes, so it also copies IsOnline, hence with our initializations the result is always true. Indeed, if we set both to False, IsOperational comes out false too.
  • An assignment of IsOnline also grabs four bytes, so also the first byte of Temp. Temp is positive in our initializations, so IsOnline is always true. Indeed, if we set Temp to zero, IsOnline comes out False.
  • Assignment of Temp really grabs the value of IsRaining at offset 24, so we get to see the value of IsRaining instead of the value of Temp.
  • The value for IsRaining is copied from the empty padding bytes at offset 28, rendering it the value 0.
  • The value or Humidity, a double, is taken from the first multiple of 8 bytes, at offset 32, hence it is correct.

So, now we know the MSIL instructions copy too many bytes, or bytes from the wrong location, how do we repair this error?

Solutions and Non-Solutions

A solution we do not want is to change the C++ code by using #pragma pack(…). #pragma is used to create non-portable code, pack is used to adapt the memory layout of structures. I don’t want to make code non-portable, just because I would like to add a GUI to that code.

Let’s review a number of approaches that might seem reasonable, but in fact will not work.

The MarshalAs Method

We could insert a clause like:

MarshalAs(UnmanagedType.Bool)

However, that one is meant for export of data to C++, targeting the Windows BOOL type, which is four bytes. For our 1 byte bool type we use:

MarshalAs(UnmanagedType.U1)

Then we change the definition of MMeteoInfo so we can marshal the bool variables, if we would like to:

[StructLayout(LayoutKind.Sequential, CharSet = CharSet.Unicode)]
public struct MMeteoInfo
{
    public string DisplayName { get; private set; }
    public string UniqueID { get; private set; }

    [MarshalAs(UnmanagedType.U1)]
    bool isOperational;
    public bool IsOperational
    {
        get { return isOperational; }
        private set { isOperational = value; }
    }

    [MarshalAs(UnmanagedType.U1)]
    bool isOnline;
    public bool IsOnline
    {
        get { return isOnline; }
        private set { isOnline = value; }
    }

    public int Temp { get; private set; }

    [MarshalAs(UnmanagedType.U1)]
    bool isRaining;
    public bool IsRaining
    {
        get { return isRaining; }
        private set { isRaining = value; }
    }

    public double Humidity { get; private set; }
}


But if we run the program, we get an error:

Let’s say this is a marshaling error.

The StructLayoutAttribute.Pack Field

If we set Packing to 4, all our troubles should be over; all fields should start at word boundary. However, mirroring the C++ layout takes precedence – the two Boolean fields keep being marshaled as two adjacent bytes, and we still get the same error message. The same result is obtained for each packing value we may choose.

Use the StructLayout Attribute with LayoutKind.Explicit

So, we cannot change the structure’s memory layout by merely specifying a packing. Next step is to explicitly specify the layout per structure field. If we do so, the definition of the structure becomes like this:

[StructLayout(LayoutKind.Explicit, CharSet = CharSet.Unicode)]
public struct MMeteoInfo
{
    [FieldOffset(0)]
    string displayName;
    public string DisplayName
    {
        get { return displayName; }
        private set { displayName = value; }
    }

    [FieldOffset(8)]
    string uniqueID;
    public string UniqueID
    {
        get { return uniqueID; }
        private set { uniqueID = value; }
    }

    [FieldOffset(16)]
    bool isOperational;
    public bool IsOperational
    {
        get { return isOperational; }
        private set { isOperational = value; }
    }

    public bool IsOnline
    {
        get { return isOperational; }
        private set { isOperational = value; }
    }

    [FieldOffset(20)]
    int temp;
    public int Temp
    {
        get { return temp; }
        private set { temp = value; }
    }

    [FieldOffset(24)]
    bool isRaining;
    public bool IsRaining
    {
        get { return isRaining; }
        private set { isRaining = value; }
    }

    // double gets laid out on a multiple of 8 bytes.
    [FieldOffset(32)]
    double humidity;
    public double Humidity
    {
        get { return humidity; }
        private set { humidity = value; }
    }
}

Note that the property IsOnline does not have a backing field of its own, It shares a backing field with IsOperational. After all, both bools are encoded in these same 4 bytes. This code works, except that IsOperational, and IsOnline are now dependent values.

So, how do we get the correct value for each bool out of the 4 bytes in the isOperational field?

We use a mask and a Boolean bitwise operator, like this:

[FieldOffset(16)]
int booleans;
public bool IsOperational
{
    get
    {
        int mask = 1;
        // The first byte of booleans contains the value of IsOperational
        int tmp = booleans & mask;
        return tmp > 0;
    }
    private set { ; } // dummy
}

public bool IsOnline
{
    get
    {
        int mask = 256;
        // The second byte of booleans contains the value of IsOnline
        int tmp = booleans & mask;
        return tmp > 255;
    }
    private set { ; } // dummy
}

And it works!

Now we have the same values as in the initialization code above.

Advertisement

A WPF GUI for a C++ DLL: A Complex PInvoke Construct

Introduction

Suppose you have a C++ DLL that needs to relay some data and possibly some error messages, and you want to present this data in a graphical user interface (GUI) that is compatible with Windows 7 and up?

Then you have quite some options, among which:

– A win32 GUI in C++.

– A GUI in WPF, connected to the DLL by C++ interop, i.e. managed C++.

– A GUI in WPF, connected to the DLL by PInvoke.

– A GUI in Qt or another 3rd party GUI library for C++.

You might want to choose the option that you are familiar with, and that has a future, also. In my case that is a choice for WPF (familiarity) and PInvoke (has a future). That is, I am not familiar with QT or other 3rd party GUI libraries, and a win32 GUI seems too tedious. I also happen to think that managed C++ is, or will be orphaned. Marshalling (which we use for PInvoke) on the other hand, has been enhanced even in .Net 4.5.1, see e.g. the Marshal.SizeOf<T>() method here.

In this blog post we will explore a WPF GUI that sends a pointer-to-callback to a C++ DLL, which uses the callback to send an array of structures (containing strings) back to the GUI, which the GUI presents to the user by means of data binding. The case will be made for a simple weather forecast system that displays some data from (imaginary) distributed measurements collected by the DLL. We will use a separate callback to allow the DLL to log meta level messages.

The reason for writing this article on PInvoke is that in my research for the solution described here, I found many explanations of advanced PInvoke techniques, but few integrated examples, and even less example of connecting PInvoke to data binding.

So, the software presented here combines a number of advanced PInvoke techniques into a coherent, easy-to-use, functional whole, connected to data binding. The complete example code (a vs2013 x64 solution) can be downloaded using the link at the bottom of this article.

Sources

I will not assert that this article contains substantial original work. It just integrates insights published (abundantly) on the internet. Places to look for adequate information on PInvoke and Marshalling are:

– The MSDN Library on PInvoke and Marshalling.

– Stack Overflow on PInvoke.

Manski’s P/Invoke Tutorial .

Particularly informative articles (to me) were:

A support article by David Stucki on wrapping a C++ class for use by managed code.

An article by JeffB on CodeProject on marshalling a C++ class.

Below we will first explore how to data bind to a string obtained from the DLL, then we will explore the case of an array of structures.

Getting a Log Message String from the DLL by Callback

And data binding it to a TextBlock in the GUI.

In this section we will first review the C++ DLL involved. Then we will discuss the case of obtaining a log message. We will thereby ignore all aspects of the C++ code that have to do with marshalling an array of structures; that will be the subject of the next section.

The Native DLL

The DLL consists of an Interface file of exported symbols, a header file that defines the implementation class, and a cpp file with the implementations.

The DLL interface is defined as follows:

The MeteoInfo structure will be presented in the next section.

We note the logCallback function pointer, the lifetime management functions CreateMeteo and DestroyMeteo, and a Send function that we use to signal the DLL to send data to the WPF GUI using callbacks.

The Header file for the implementation of the interface is as follows.

We see a simple class derived from the Interface. Note the fields, initialized by the constructor, that hold the callback function pointers for local, repeated use.

The cpp implementation file is as follows:

So basically, the Meteo::Send method invokes the log callback (m_lcb) with a wchar_t constant.

Then, what do we need to data bind the result of this call to a TextBlock in the WPF GUI?

WPF GUI: The Logging Text Part

First of all we need to declare that we will use methods from the DLL in the C# code to create a Meteo object that holds a pointer to the log callback, and to signal the DLL to send data to the WPF GUI. In this simple scenario, the DLL responds to invoking the Send method by invoking the callback once, but in a realistic setting the Send method would start a process that repeatedly invokes the callback autonomously – according to its own logic.

The argument for Send is the instance we obtained from CreateMeteo. Obviously (being the argument for CreateMeteo) , we need a delegate called LogDelegate:

Note the CharSet specifier. We need this since the default is ANSI. Next we bind the delegate to an actual method:

Here we copy the native string referred to by the IntPtr pointer to a managed string.

LogString is a property, not a field. We use a property so we can data bind a TextBlock to it. The property is:

The OnPropertyChanged call is part of a standard INotifyPropertyChanged implementation.

The data binding in XAML is just:

And that’s all.

Getting an Array of Structures from the DLL by Callback

The relative simplicity of the above was somewhat surprising to me, since explanations of PInvoking strings, in articles on the internet can be dauntingly complex. The good news is that applying the same pattern to an array of structures, that hold strings as well as other data types, does not lead to much additional complexity.

Recall the C# DLL function declaration that creates a Meteo object:

It also holds a delegate for relaying data that we use to update the GUI. GuiUpdateDelegate is defined as:

The delegate’s parameters are a pointer to a native array, and an int that designates the size of the array.

The array is a simple array of MeteoInfo structures. In order to relay the data we need corresponding structures in C++ and in C# (managed code). The native structure is:

The corresponding managed structure is:

You might expect fields here, instead of properties. We should keep in mind, however, that a property is just some code around a field. If we would define the structure with fields, the size in bytes of an object of the structure would be the same. However, we need (public) properties in order to support data binding.

The delegate specified above is bound to an actual method that produces an array of MMeteoInfo objects:

The Marshal.PtrToStructure method copies the native data into a managed structure.

The InfoList object mentioned in the code above is a ListView defined in XAML

And we’re done. Output from the sample application looks like this:

Link to Sample Code

Sample Code

PInvoking DirectX from Silverlight

Before moving on to Windows 8 development, I decided to write some legacy software. Well actually, this legacy software is perfectly up-to-date Windows 7 level software; tricks presented here will be useful for years to come. It’s just that Windows 8 (Consumer Preview) provides standard solutions to the problems solved here. This blog post discusses the use of a DirectX application, packaged as a DLL, by a Silverlight application, via PInvoke.

The problems tackled here stem from the desire to have Rich Internet Applications (RIAs) for Windows, that use computational resources on the client computer. In particular DirectX for 3D-graphics, X3dAudio, for 3D-audio, and also the GPU (Graphics Processing Unit – a powerful, highly parallel processor). Silverlight provides the facilities to write RIAs, but has a somewhat outdated 3D-graphics library: a subset of XNA – a managed wrapper for DirectX9 (but we want DirectX11, at least!). This Silverlight 3D-graphics library is not very extensive, it lacks e.g. 3D-audio.

On the other hand, Silverlight does provide facilities for interoperability with native code, e.g. by means of PInvoke: the invocation of native code in Dynamic Link Libraries (DLLs). PInvoke is here the bridge between Silverlight and DirectX code.

This blog post presents:

  • A sample DirectX11 application, and its transformation into a DLL to be used from Silverlight.
  • A Silverlight application that calls methods in the dll.
  • How to install and uninstall the DLL, and how to manage its lifetime explicitly, so the DLL may be uninstalled by the Silverlight application itself.
  • Performance aspects of the Silverlight-DirectX application, and a comparison with a Silverlight application that uses the Silverlight 3D-graphics library for the same task.
  • Concluding remarks, for one thing that this application should have had 3D-audio to decisively mark the advantage of the approach presented here (but at some point, you just have to round up).

The DirectX 11 Sample Application

The DirectX 11 Tutorial05 sample application will serve as the application a user wants to run on his or hers PC, and that uses resources already present on that PC. This DirectX application is the most simple application that contains some animation, and it has also a part – the small cube – that we can multiply in order to generate data for various performance loads.

To that end we transform it into a DLL with as much unnecessary functionality stripped, and an adequate interface added, including the code to transfer the data we need in the Silverlight application. Let’s take a look at the main changes.

Minimizing Window Management Code

For starters, We do not need a window, we use the DirectX application only to compute the 3D-graphics we present in the Silverlight application. The wWinMain (application entry point) function now looks like this:

Sample code like above is entered into the text as pictures. If you would like to have the code, just leave a comment on this blog with an e-mail address and I will ship it to you.

The function has no “Windows” parameters any more, nor has it a main message loop. The InitWindow function has been reduced to:

We do need to create a window in order to create a swap chain, and only for that reason, so we keep it as simple and small as possible. Note that the wcex.lpfnWndProc is assigned the DefWindowProc. That is: the application has no WindowProc of its own.

Create Texture to be Used in Export

In order to export the 3D-graphics data, an additional texture (a texture is a pixel array) called g_pOutputImage is created in the InitDevice function:

This texture has usage “Staging”, so the CPU can access it, and we specified CPU access as “Read”. With these settings we can’t bind the texture to the DeviceContext anymore, so no BindFlags. Note that we cannot have a texture that the GPU writes to, and the CPU reads from. If that would have been possible we could have had a data structure that both DirectX and Silverlight could have used directly. Since this is impossible we will have to perform expensive copy operations. Alas.

A final change in this same function is that we do not release the pointer to the back buffer, but keep it alive in order to export the graphics data in the Render function.

Rendering 3D-Graphics

The Render function has a loop added so we can have multiple small cubes. The idea is to compute a World matrix for each additional small cube. That is, we have only one cube, but draw it multiple times at different locations. Like this:

and:

Converting and Exporting 3D-Graphics Data

Finally, we want to copy the 3D-graphics data into an array the Silverlight client has provided, so that the client can show it to the user. This is done like so:

The above is standard code, I obtained it around here (the direct link seems broken). The ConvertToARGB function, however is a custom addition, replacing the memcpy call (more about that in the section on performance). This ConvertToARGB converts the RGBA format of DirectX to the premultiplied (PM) ARGB format used in Silverlight. This PM ARGB format is considered legacy now. The conversion step is a real performance hit as anyone can imagine. The function looks like this:

Essentially this OR-s 4 integers, the first one is constructed by byte-shifting the A (transparency) byte all to the left, then 3 integers are created by pushing the RGB bytes in place. This is a fast algorithm since shifting is a quick operation. I found it here. After the conversion, the pixels are in the correct format in an array that is owned by the Silverlight client application.

The DLL Interface

The interface has the following methods:

And for performance measurements:

The above functions return an average time over the Render function, and an average time over the conversion and export respectively. Details will be discussed below. The

decoration results in a clean export of the function names. Without the decoration, the C++ compiler will add a number of tokens (among which at least a few like @#$%^&*) to the function name in order to make it unique. The problem with this is that you’ll have a hard time retrieving the actual function name for use in the Silverlight client.

The Silverlight Client

General Architecture

The application has the following structure:

The App class is the application entry point (as usual). The Application_Startup event handler, depicted below,

first checks if the application is running out-of-browser (OOB). Running OOB is the intended normal use of this application. If so, a MainPage control is instantiated which will run the DirectX code. If the application is running in-browser, it still needs to be installed. Only after installation, the application has access to the file system – required to save and load the dll – and to the GPU. The application requires Windows 7 or higher and bails out if a lower level Windows or Apple OS is found.

The install page offers to install the application on the user’s PC, as depicted below,

or tells the user that the application is already installed, and hints at ways to uninstall the application if so desired.

If the user installs the application, it starts running out of browser and shows the MainPage with the DirectX animation.

Installing, Uninstalling, and Managing DLL Lifetimes

Installing includes saving the DirectX application in the DLL to a file on the user’s PC. The DLL is packaged with the Silverlight application as a resource. For execution, the DLL has to be loaded in memory, or be present on the PC as a file. Saving the DLL to file is done with code after an example from the NESL application. We store the application at “<SystemDrive>ProgramDataRealManMonths PInvokeDirectXTutorial05”.

Once the DLL is saved to file we load it into memory using the LoadLibrary function from the kernel32.dll. The reason we manage the dll’s lifetime explicitly instead of implicitly by importing the dll, and calling its functions, is that we need to be able to explicitly remove the dll from memory when exiting the application, see below. Loading into memory requires a dll import declaration:

And a call of this function, in the MainPage_Loaded event handler:

Where DllPath is just the path specified above. Is that all? Yes, that’s all.

When the application is exited, we use the handleToDll to release the library with repeated calls to FreeLibrary. Declaration:

Then we call it in the Application_Exit event handler as follows:

The point is that each method we import from the dll increases the reference count. As long as the reference count is larger than zero we cannot unload the DLL, nor delete its file. Not being able to delete the file means we cannot properly uninstall the application – we would leave a mess. Once the ref count is zero, FreeLibrary unloads the library from memory.

The final question in this section is why we delete the dll file every time we exit the application, and create the file every time we start it up. The reason is that if we do not do that, and the user uninstalls the application from the InstallPage (running in-browser), the application does not have the permissions to access the file system, hence the DLL file will not be deleted. So, all these file manipulations are bound to the runtime of the application in order to have a clean install and uninstall experience for the user.

PInvoking the DirectX Functions

Now that the application can be installed, functions from the DirectX application interface can be declared and executed.

[DllImport(DLL_NAME, SetLastError = true, CallingConvention = CallingConvention.Cdecl)]

public extern static int Init(int width, int height,

[MarshalAs(UnmanagedType.LPWStr)] String effectFilePath);

[DllImport(DLL_NAME, SetLastError = true, CallingConvention = CallingConvention.Cdecl)]

public extern static void Render([In, Out] int[] array);

[DllImport(DLL_NAME, SetLastError = true,CallingConvention = CallingConvention.Cdecl)]

public extern static int Cleanup();

[DllImport(DLL_NAME, SetLastError = true, CallingConvention = CallingConvention.Cdecl)]

public extern static void GetRenderTimerAv(ref double pArOut);

[DllImport(DLL_NAME, SetLastError = true, CallingConvention = CallingConvention.Cdecl)]

public extern static void GetTransferTimerAv(ref double pArOut);

We make a call to the Init function in the MainPage_Loaded event handler, calls to the dll Render function, in the local Render method, and a call to CleanUp in the Application_Exit event handler.

Calls to the timer functions are made when the user clicks the “Get Timing Av” button on the MainPage.

Debugging PInvoke DLLs

At times you may want to trace the flow of control from the Silverlight client application into the native code of the DLL. This, however is not possible in Silverlight. Silverlight projects have no option to enable debugging native code. Manually editing the project file doesn’t help at this point. Now what?

A work around is to create a Windows Presentation Foundation (WPF) client. I did this for the current application. This WPF application does not show the graphics data the DirectX library returns, it just gets an array of integers.

To trace the flow of control into the DLL you need to uncheck ”Enable Just My Code (Managed only)” at (in the menu bar) Tools | Options| Debugging, and to check (in the project properties) “Enable native code debugging” at Properties | Debug | Enable Debuggers.

If you now set a breakpoint in the native code and start debugging from the WPF application, program execution stops at your breakpoint.

Reactive Extensions

In order to have a stable program execution, the calls to the dll’s Render method are made on a worker thread. We use two WriteableBitmaps, one is returned to the UI thread upon entering the Silverlight method that calls the dll’s Render method, the other WriteableBitmap is then rendered to by the DLL. After rendering, the worker thread pauses to fill up a time slot of 16.67ms (60 fps).

Thread management and processing the indices that point into the WriteableBitmap array (implementation detail J ) is done using Reactive Extensions (RX). The idea is that the stream of indices the method returns is interpreted by RX as an Observable collection and ‘observed’ such that it takes the last index upon arrival, and uses the index to render the corresponding WriteableBitmap to screen. This results in elegant and clean code, as presented below.

The first statement create an observable collection from a method that returns an IEnumerable. Note that ‘observing’ is on the UI thread (referred to by the ‘DispatcherScheduler’)

The SubscribeOn(ScheduleNewThread)-clause creates a new thread for the render process. The lambda expression defines the action if a new int (index) is observed.

Rendering on the worker thread proceeds as follows:

To stop rendering we just put IsRunning to “false”. And that’s it.

Performance

DirectX applications – by definition – have higher performance than .Net applications. However, if you pull out the data from a DirectX application and send it elsewhere, there is a performance penalty. You will be doing something like this:

CPU -> GPU -> CPU -> GPU -> Screen instead of CPU -> GPU -> Screen

The extra actions: copying data from the GPU to CPU accessible memory and converting to Premultiplied ARGB will take time. So the questions are:

  1. How much time is involved in these actions?
  2. Will the extra required time pose a problem?
  3. How does performance compare to the Silverlight 3D-graphics library?
  4. Are there space (footprint) consequences as well?

Before we dive into answering the questions, note that:

– The use of DirectX will be primarily motivated by the need to use features that are not present in the Silverlight 3D-Graphics / -Audio library at all. In such cases comparative performance is not at all relevant. Performance is relevant if the use of DirectX becomes prohibitively slow.

For the measurements I let the system run without fixed frequency; usually you would let the system run at a frequency of 60Hz, since this is fast enough to make animations fluent. At top speed, the frequency is typically around 110Hz. I found no significant performance differences between debug builds and release builds.

Visual Studio 11CP Performance analysis: Sampling

If we run a sampling performance analysis – this involves the CPU only, the bottleneck in the process becomes clear immediately: The conversion from RGBA to premultiplied ARGB (and I’m not even pre-multiplying) takes 96.5% of CPU time.

It is, of course, disturbing that the bulk of the time is spent in some stupid conversion. On the other hand, work done by the GPU is not considered here.

To investigate the contribution of the conversion further, I replaced the conversion by a memcpy call. Then we get a different color palette J, like this:

But look, the frequency jumps up to 185 fps (80% more). The analysis then yields:

That is: much improved results, but shoving data around is still the main time consumer. Note that the change of color palette by the crude reinterpretation of the pixel array is a problem we could solve at compile time, by pro-actively re-coloring the assets.

Compare to a Silverlight 5 3D-library application

Would the performance of our application hold up to the performance of a Silverlight application using the regular 3D-graphics library? To find out I transformed the standard Silverlight 3D-graphics starter application to a functional equivalent of our Silverlight-DirectX application, as depicted below – one large cube and 5 small cubes orbiting around it (yes, one small cube is hidden behind the large one).

If we click the “Get Timing Av button”, we typically get a “Client Time Average” (average time per Draw event handler call) of 16.6.. ms, corresponding to the 60 fps. The time it takes to actually render the scene averages to 3.3 ms. This latter time is 0.8ms without conversion, and 2.8ms with conversion for the Silverlight – DirectX application (if we let it run at max frequency). So, the Silverlight-DirectX alternative can be regarded as quicker.

If we look at the footprint, we see that the Silverlight-DirectX application uses 1,880K of video memory, and has an image of 50,048K in the Task Manager. The regular Silverlight application uses 5,883K of video memory, and has a 37,708K image. Both in SLlauncher. So, the regular Silverlight application is smaller.

Concluding Remarks

For one, it is feasible to use DirectX from Silverlight. PInvoke is a useful way to bridge the gap. This opens up the road to use of more, if not all, parts of the DirectX libraries. In the example studied here, the Silverlight-DirectX application is faster, but has a larger footprint.

We can provide the user with a clean install and uninstall experience that covers handling and lifetime management of the native dll.

Threading can be well covered with Reactive extensions.

There is a demo application here. This application requires the installation of the DirectX 11 and the Visual C++ 2010SP1 runtime packages (links are provided at the demo application site). I’ve kept these prerequisites separate, instead of integrating their deployment in the demo application installation the NESL way, mainly because the DirectX runtime package has no uninstaller.

If you would like to have the source code for the example program, just create a comment on this blog to request for the source code, I’ll send it to you if you provide an e-mail address.

PInvoke with Silverlight

As indicated in the previous blog post: PInvoke is the next best thing if you want to use native C++ code from Silverlight. And the first next thing that works.

What is PInvoke

PInvoke, or Platform Invoke is about the invocation from .Net code of dynamic link libraries (dll-s), often written in C++, and frequently part of existing systems like the Windows OS. The idea is that the library in the dll, exports a number of symbols representing methods (including properties) and hooks for callback functions (think: events).

Silverlight supports PInvoke and therefore also unsafe code. Unsafe code requires manually adding the “AllowUnsafeBlocks” tag to the Silverlight project file. Of course the use of PInvoke requires elevated trust, both in-browser and out-of-browser. The dll must be a file on the client computer. If you want to bring along your own dll with your Silverlight application, you will have to write your library to file somewhere, and then load it into memory for invocation. NESL provides an excellent example of this technique.

The hard part of PInvoke is Marshalling (found that out already). You also have to remember that the file location of the dll you want to invoke needs to be in the shell path, or explicitly stated in the dllimport attribute. In the context of Silverlight applications, the ‘current directory’ is not such a fantastic location to search for a dll.

What could you do with PInvoke

The driver for using PInvoke is that you can use resources already present on the client. If you bring your own dll, it can make use of other resources already present on the client. For instance, you could bring your own DirectX application, and have it use the DirectX runtime code present on the client. You can also bring along a dll that explicitly uses the spectacular parallel computing power of the GPU.

For me the reason is that PInvoke provides access to the DirectX and Media resources that a standard installation of Windows 7 brings along. I want to just write an application that may use anything the Windows SDK has to offer related to DirectX, other graphics, and audio & video and combine it with the goodies of Silverlight – notably its UI facilities, its software distribution facilities and its in-browser capabilities. Going directly to the Windows SDK keeps me independent of intermediate frameworks like XNA, SlimDX or SharpDX, so I can keep my software up-to-date myself, as opposed to e.g. XNA. It also seem to me that going this direction anticipates the release of Windows 8, the increasing emphasis on performance and smaller footprint that initiated the renaissance of C++(11), concurrent and asynchronous programming, and the openness of more platforms (form factors) to C++ development.

Of course, PInvoke requires the invoked dll to be present on the client. This may seem a drawback, but scenarios that motivate the use of dll-s for PInvoke (running software on the GPU, mainly) usually require (in practice) the Silverlight application to be installed as an OOB application with elevated trust anyhow. Saving a dll to disk will not make the difference.

Pro’s and Con’s of PInvoke

So, what are pro’s and con’s of PInvoke? Advantages of PInvoke are that it is supported by Silverlight – as opposed to C++ managed extensions mixed with native code, that it allows the use of C++ dll-s, and that these dll-s can be packaged and distributed along with a Silverlight application. Compared to the use of COM componentsthe advantages are the smaller overhead, and the fact that no formal installation is required, because no insertions in the registry are required.

Drawbacks of PInvoke are: well – it’s not as easy as a managed C++ dll that has native code mixed in, there is the marshalling overhead, implying restrictions on possibilities and performance, and PInvoke is not always that easy to use: there are some hard to find gotcha’s. And then there is this question: if I invest time to learn about PInvoke, what will this knowledge be worth when Windows 8 comes? Is PInvoke something of the PC, or will it be supported on other platforms as well?

Debugging PInvoke DLL-s from Managed Code

Many, many questions, and great despair can be found in the community forums concerning stepping through the native code – called from managed code- in debugging PInvoke scenarios.

Indeed, there seems to be no way to debug a PInvoke dll from Silverlight in Visual Studio 2010. The nearest thing is to create a Windows Presentation Foundation (WPF) client and debug it from there (bring code from your Silverlight application). Then, stepping through the C++ code from the .Net client is easy.

In the Properties of the project:

  1. Enable unmanaged code debugging.
  2. If required, rebuild your code, both client and dll.

Set a breakpoint in the native code, and see that process execution stops right there.