Harder to C++: Monads for Mortals [3], Lazy implementation

This blog post is part 3 in a series. This part presents a simple implementation of a lazy evaluating monad. It is a minimal variation of the implementation in part 2.

Below we will see how the implementation is constructed, then an example is given that provides initial verification that the construction is indeed a monad.

Implementation of a Lazy Monad

Implementation starts again with some includes and a using statement. The first important construct is the monad type constructor, a C++ template which in this particular case takes the form of a std::function template:


// Monad type constructor: a std::function template
template<typename T>
using monad = function < T() >;

The using statement defines ‘monad’ as a type alias.

Of course, a suitably formed pointer to function object would suffice as well. The std::function template has the advantage that it looks neat, and we can instantiate it in an elegant way using a lambda expression. Thus upholding some of the functional character of the monad’s roots.

The unit function, which creates instances of the ‘monadic’ function object is as follows:

// Monad unit function, wraps a value in a lambda
template<typename V>
monad<V> unit(V val)
{
       return[=](){ return val; };
}

The unit function returns a lambda expression the returns a value, when executed (later some time, if any).

The bind function follows the description of bind operators to the letter. It evaluates the monad argument, and returns a function that applies the function argument to the result of that evaluation:


// Monad bind operator
template<typename A, typename R>
monad<R> operator|(monad<A>& mnd, monad<R>(*func)(A))
{
       // return a callable to evaluate later
       return[=]()
       {
             A unwrapped = mnd();
             monad<R> result = func(unwrapped);
             return result(); //parentheses, because we define a function that returns a value
       };
}

The returned function is not evaluated before function call is applied to it. Hence using this bind operator we can construct long and complex function compositions, which get evaluated only after we explicitly do so.

The above triple is the complete implementation of the monad. Yes I know, there should be two additional operations defined as well: the sequencing operator and the fail operator (see e.g. Mike Vanier, part 3. However, many texts discussing monads indicate that these operations are uninteresting. So, we will skip them in this series.

Let’s add the same functions as in part 2, and run a simple composition:


// divides arg by 2 and returns result as monadic template
monad<int> divideby2(int i)
{
       return unit<int>(i / 2);
}

// checks if arg is even and returns result as monadic template
monad<bool> even(int i)
{
       return unit<bool>(i % 2 == 0);
}

int _tmain(int argc, _TCHAR* argv[])
{
       SetConsoleTitle(L"Harder to C++: Monads [3]");

       // Wrap 22 in monadic template
       auto m1 = unit<int>(22);

       // Apply bind 4 times in function composition
       auto m2 = m1 | divideby2 | divideby2 | divideby2 | even;

       cout << boolalpha << m2() << endl;

       cin.get();
       return 0;
}

Note that the functions ‘divideby2’ and ‘even’ have not changed. The only change in the _tmain function is that in the output statement m2.value has been replaced by m2(). Note the parentheses, which denote lazy evaluation of the constructed composition.

Minimal Verification that Monadic Laws Hold

The minimal verification is the lazy analog to verification in the eager case. It looks like this:


int _tmain(int argc, _TCHAR* argv[])
{
       SetConsoleTitle(L"Harder to C++: Monads [3]");

       // Wrap 22 in monadic template
       auto m1 = unit<int>(22);

       // Left identity
       // First explicitly convert to function pointer (because of template)
       auto pf1 = &unit < int >;
       // then apply bind operator
       auto m2 = m1 | pf1;

       cout << "Left Identity result: " << m2() << endl;

       // Right identity
       auto m3 = m1 | divideby2;
       auto m4 = divideby2(22);

       cout << boolalpha << "Right Identity result : " << (m3() == m4()) << endl;

       // Associativity
       // Case 1: equivalent to bind(m1, divideby2);bind(m5, even)
       auto m5 = m1 | divideby2;
       auto m6 = m5 | even;

       // Case 2: equivalent to Bind(m1, divideby2;bind(..., even));
       // Create function composition
       auto f = [](int i){ return divideby2(i) | even; };

       // Explicitly convert f to function pointer
       auto pf2 = static_cast<monad<bool>(*)(int)>(f);
       auto m7 = m1 | pf2;

       cout << boolalpha << "Associativity result : " << (m6() == m7()) << endl;

       cin.get();
       return 0;
}

which generates output:

image0011

as expected (and desired).

Pros, Cons

Some texts declare that lazy implementation provides advantages over eager or strict evaluation. Advantages presented are:

  1. Calculations are only made when required and in as far as required.
  2. ‘Lazy’ allows he evaluation of lists that are unbounded (endless, infinite)
  3. Delayed evaluation of function compositions allows for an optimization before evaluation of the composition takes place.

What to think of this?

The first advantage strikes me as odd; I usually do not write programs that make calculations which’ results are not required.

The second advantage is odd as well. My computer is as powerful as a Turing machine, hence it can process input lists of unboundedly length. Without lazy evaluation.

The third advantage could be a real advantage, but I wouldn’t know how to do this in C++; the advantage presupposes that it is possible to create code at runtime and then compile and execute it, which isn’t true for C++.

I do see a disadvantage, though, and we will get to it in detail when doing some shootouts between the various alternative monad implementations. The disadvantage is that the software does extra work. It first creates an expression, then evaluates it. So in C++, for each lazy evaluating program, there is an equivalent eager evaluating program that is faster and smaller, hence more competitive.

In the next part of this series we will work on an (eager) implementation that has the same time performance characteristics for any size value. There will be many references and move semantics. Hmm … mjummy 😉

Advertisement

Harder to C++: Monads for Mortals [2], First implementation

This blog post is part 2 in a series. Part 1 is a general introduction. This part discusses a first implementation of the monad in C++.

There are two fundamentally different approaches to implementing monads in C++. Let’s first discuss the approach we will not pursue.

A Way We Will Not to Implement a Monad in C++

The C++ template mechanism is a full functional language (this discovery, by Erwin Unruh, was a bit of a surprise). As a consequence C++ templates are sometimes used for template meta programming: programs can be written using (only) C++ templates and are as such evaluated / executed, at compile time. There are not many practical uses for template meta programming. One practical use was to unroll (small) loops in order to gain performance. This gain, however, can nowadays also be obtained by modern, optimizing C++ compilers.

The discovery that the C++ template mechanism constitutes a functional language, also has lead some people to implement monads in a template meta programming based functional language. Examples are the Cee Plus Plus Monad Example, and Implementing Monads for C++ Template Metaprograms. However, these implementations live in a part of C++ that is little used. Moreover, the required syntax is complex, which makes it unattractive for general use.

The above approach and the goal pursued here are, I think, trying to answer different questions. The above examples seem to try to mimic functional programming with C++, and implement monads in that context. Contrary to bringing C++ to functional programming, I want to know if bringing the functional programming construct ‘monad’ to C++ will provide me with an advantage, and to what cost.

Below we will start with a simple implementation of a monad in mainstream C++ and show that it is indeed a monad. Then we will see what we like or dislike. Note that we will not be doing any functional programming, which, in fact, is quite in the spirit of Eugenio Moggi’s intentions.

A Simple, Mainstream C++ Implementation of the Monad

Implementation starts with some includes and a using statement. The first important construct is the monad type constructor, or rather: the C++ template.

#include <iostream>;

using namespace std;

// monad type constructor
template<typename V>; struct monad
{
	// Wrapped value
	V value;
};

We saw in part 1 that the result of the unit function has the semantics of a computation. As you can see, this C++ class / struct template does not have any computations, it is a trivial computation. For one thing, we could add a function application operator to it ( operator() ), that would perform some non trivial computation, and we might indeed at some point do so.

The next item to define is the unit function, the factory:

// factory: unit function
template<typename V> monad<V> unit(V val)
{
	return monad < V > { val };
}

It is simplicity itself. An alternative could have been to implement the unit function as the monad struct constructor. That would have been more efficient, so we will do that in a number of following implementations.

I have given the bind function the form of an overload of the bitwise OR operator ” | “.

// Bitwise OR operator overload: bind function
template<typename A, typename R>
monad<R> operator| (monad<A>& mnd, monad<R>(*func)(A))
{
	return func(mnd.value);
}

I got the idea to use an operator instead of a function called ‘bind’ from the CeePlusPlus example referred to above. However, that code overloads the ” >>= ” operator, in order to make the code resemble Haskell somewhat. I prefer the ” | ” because it is the same symbol as the Unix / Linux shell pipe operator. And indeed, we will see shortly that in function composition, bind can well be considered to pipe results from function to function.

The above bind function first ‘unwraps the value’, by referencing the value of the monad object, it then applies the function ‘func’ to it, and returns the result wrapped in a new monad template object.

At this point we have a first implementation of a monad! Note how very small and simple it is. Let’s add some functions and give it a spin.

// divides arg by 2 and returns result as monadic template
monad<int> divideby2(int i)
{
	return unit<int>(i/2);
}

// checks if arg is even and returns result as monadic template
monad<bool> even(int i)
{
	return unit<bool>(i % 2 == 0);
}

int _tmain(int argc, _TCHAR* argv[])
{
	// Wrap 22 in monadic template
	auto m1 = unit<int>(22);

	// Apply bind 4 times in function composition
	auto m2 = m1 | divideby2 | divideby2 | divideby2 | even;

	cout << boolalpha << m2.value << endl;

	cin.get();
	return 0;
}

Note the elegant function composition offered by the bind operator.

Minimal Verification that Monadic Laws Hold

By means of a single example we will verify that the monadic laws (see part1) hold:

int _tmain(int argc, _TCHAR* argv[])
{
	// Wrap 22 in monadic template
	auto m1 = unit<int>(22);

	// Left identity
	// First explicitly convert to function pointer (because of template)
	auto pf1 = &unit < int >;
	// then apply bind operator
	auto m2 = m1 | pf1;

	cout << "Left Identity result: " << m2.value << endl;

	// Right identity
	auto m3 = m1 | divideby2;
	auto m4 = divideby2(22);

	cout << boolalpha << "Right Identity result : " << (m3.value == m4.value)
	     << endl;

	// Associativity
	// Case 1: equivalent to bind(m1, divideby2);bind(m5, even)
	auto m5 = m1 | divideby2;
	auto m6 = m5 | even;

	// Case 2: equivalent to Bind(m1, divideby2;bind(..., even));
	// Create function composition
	auto f = [](int i){ return divideby2(i) | even; };
	// Verbosely convert f to function pointer
	auto pf2 = static_cast<monad<bool>(*)(int)>(f);
	auto m7 = m1 | pf2;

	cout << boolalpha << "Associativity result : " << (m6.value == m7.value)
	     << endl;

	cin.get();
	return 0;
}

which generates output:

The funny thing about the associative law is that the intuitive use of the bind operator like in:

auto m2 = m1 | divideby2 | even;

is equivalent to:

auto m2 = bind(bind(m1, divideby2), even);

which is very obviously equivalent to Case 1 above. So indeed, parentheses do not matter as long as we pipe the result of applying divideby2 to m1 into event.

Pros, Cons, and Questions

So, now that we have made a start, what to think of it?

The ‘pros’ are:

  • The small size
  • The very elegant function composition.
  • From a functional programming perspective one might add that this implementation works with immutable data.

The most visible ‘cons’ are:

  • The code copies function arguments and function results, so it is inefficient, and performance for large objects will be bad.
  • The const qualifier is completely absent from the code.
  • It would be more efficient to make the unit function the constructor in the monadic template (as it is in the examples in Eric Lippert’s tutorial on monads in C#).

There is also this question about the bind operator:

  • Why is the bind operator not a member of the monadic template like with Lippert? Note that doing so would turn the monadic template into the complete monad. Well, this is C++, and I like to follow C++ best practices as accumulated by Sutter and Alexandrescu here, see item 44 “Prefer writing nonmember nonfriend functions”. There are more reasons, having to do with composition of different types of monads. But that’s for later…

Next time: a simple implementation of the monad for lazy evaluation.

Harder to C++: Monads for Mortals [1]

Posted: October 22, 2014 in Harder to C++
Tags: ,

Harder to C++: Monads for Mortals [1]

The monad is a programming construct, a coding idiom, or perhaps even a design pattern. Its roots lie in Category Theory, coming to programming via programming language semantics and functional languages. I have been reading up on monads (there are multiple, closely related variants), specifically monads for C++. It turns out that the concept of a monad is quit slippery; one minute you think you have a nice understanding, the next minute you are back at zero.

It seems to me that for a thorough understanding of what monads are, you need some knowledge of Category Theory and neighboring fields in logics and algebra, and sound knowledge of the functional programming language Haskell. But alas, I’m just a simple mortal programmer. Moreover:

  • I don’t want to know about Category Theory!
  • I don’t care about have time for Haskell !
  • I just want to write programs in C++!

An alternative route to understanding monads that suits me (simple mortal soul) better, then, is to experiment with various implementations of monads in C++, and evaluate the results, experiment with an improved implementation. And so on.

I have been busy running this experimental cycle, and will describe the condensed experiences in a number of blog posts.

Many interesting things happened, but I can’t say I found a satisfying implementation. Indeed, I have come to doubt the usefulness of monads for application in C++, despite its conceptual and syntactical beauty. Even worse, I have come to doubt the usefulness of some other additions to the C++ language, new since C++11.

But monads are hot!, They must be useful in C++! Well, let us be clear about our motive to write programs in C++. The unique selling points of C++ are (i) the fastest code, against (ii) the smallest footprint. I think people buy in on C++ for exactly these selling points.

Let’s compare with driving a car (what a boyish thing to do). Programming in C++ is then, of course, driving a formula 1 race car; fast, small, unsafe, and uncomfortable. You want comfort, drive a large American saloon, i.e. code in a language designed for developer productivity. You want to be safe, correct? Drive a Toyota Prius, i.e. program a functional language.

Of course, Formula 1 drivers want to be as safe and comfortable as possible. But not at the expense of performance!

So, the monad can be a contribution to C++, if(f) it has no time, space performance cost.

Some Background on Monads

Let’s see what monads are, where they come from, and how they got into programming.

For a C++ developer, a monad is a triple <M, u, b> where:

  • M is a template (yes, m for monad 🙂 ).
  • u is a factory function, in general called unitof signature a -> M<a>, that given an object or value of some type a creates a template object of type M<a>.
  • b is a function application function called bind of signature (M<a>, f) -> M<b> that:
    • Retrieves the object of type a from M<a>
    • Applies a function f: a -> M<b> (from type a to a template of type M<b>)
    • Returns a template of type M<b>

This triple has to satisfy three laws in order to be a monad:

  1. Left identity: bind(M<a>, u) = M<a> (so left means left argument for bind)
  2. Right identity: for an f: a->M<b>, bind(M<a>, f) = f(a)
  3. Associativity: bind(x, f); bind(y, g) = bind(x, f; bind(y, g))

In the description of the associative law:

  • x is a variable of type M<a>
  • y is the result of bind(x, f)
  • the ‘;’ operator denotes left to right sequencing of operations
  • f is a function of type a -> M<b> and g is a function of type b -> M<c>

Now. let’s add some intuition.

According to Eugenio Moggi, the semantics of M is that of a computation. He means to include a general class of computations, e.g. partial computations, nondeterministic computations, side-effects, exceptions, continuations, and interactive input and output, and possibly more.

Further, u is the inclusion of value a in a computation, as a parameter. So, we may think of M as a computation.

The application function b (applied to function f) is the extension of a function f from values to computations to a function from computations to computations, which first evaluates a computation and then applies f to the resulting value.

Philip Wadler took the monad to Haskell and showed it can be used to do bad things in a good way. That is, to perform imperative programming language operations in a pure functional language way. Haskell is a pure functional language. In a pure functional language all functions are pure, i.e. functions in which the input-output relation cannot be augmented by things like state, or context, or whatever; the domain – codomain relation is fixed. In a pure functional language you can thus have no side effects, or interactive input / output, etc.

The monad solves this problem by encapsulating ‘imperative operations’ in the M computation. According to Wadler a function

f: a -> M<b>

is then said to map type a onto type b, with a possible additional effect captured by M. The monad takes the ‘imperative operations’ out of the (pure) function application mechanism, and the functional composition chain, and thus saves the pure character of the pure functional language.

Does this talk about functional language has any value for C++? That is debatable. C++ is an imperative language, the idea to improve it by a construct that makes a functional language do imperative operations is preposterous. On the other hand, Bartosz Milewski is convinced that concurrency in C++ would be improved greatly if it would be structured the monadic way (think of the continuations mentioned above). Concurrency is new territory for C++, so we have to investigate this further. I intend to discuss this viewpoint somewhere in this series of articles on monads. First I want to develop a thorough understanding of monad implementations in C++.

Next in this series: a first C++ implementation of a monad.

Links to Texts on Monads

Who writes or wrote about monads, and what do they think is the merit of monads?

  1. Eugenio Moggi wrote Notions of computation and monads, about. This paper introduces monads as the categorical semantics for computations. It is very hard to read, because full of funny mathematical words that have a very precise meaning which then, of course, hardly anybody knows exactly. According to Moggi, monads allow mathematicians to reason about the equivalence of a very general class of programs.
  2. Philip Wadler introduced monads into Haskell in order to perform ‘imperative operations’ in a decent way. Very readable text.
  3. Mike Vanier wrote an extensive introduction into monads. Hard to read because of much Haskell code. After Philip Wadler he states that monads are key in allowing programmers to write side-effecting programs in pure functional languages.
  4. Bartosz Milewski is a fervent supporter of application of monads to C++, specifically in the context of concurrency. He has written much texts that might make reading Moggi’s text easier. Milewski stresses the idea that std::fucture should be monadic.
  5. Eric Lippert wrote a very (very) accessible introduction to monads for C#. He saw merit of monads in the construction of LINQ-to-Objects.

Boolean Fields in a Struct: Another Complex PInvoke Construct

Adjacent Boolean fields in a structure constitute a problem in marshaling a C++ struct to C# .Net. Point is that the memory layout of structs is maintained in marshalling. Using the MarshalAs function or the StructLayout Pack field doesn’t solve the problem. Sharing of the bool aggregation memory word by several Properties, in combination with bit-masks and a bitwise operator, does however do resolve the situation.

Introduction

In the previous blog post we saw how to use PInvoke to copy an array of structs from C++ to C#, using a callback. In this blog post we build on the code developed in that previous post to solve a problem in working with Boolean fields (fields of type bool).

I know, it should be easy. However, it is complicated.

Point is: if we extend our structure with a single Boolean field, marshaling works fine, but if we add two adjacent Boolean fields, marshaling breaks down. Why?

Let’s first see what happens, then analyze the problem , and with the analysis in hand evaluate solution alternatives. And yes, the problem will be solved.

Adding Boolean Fields to a Struct, Then Marshal it in PInvoke

Assume we would like to extend our C++ MeteoInfo (meteorological Information) struct with a Boolean field indicating whether it is raining (whether there is precipitation) at the meteo station at time of measurement. In C++ we get:

struct MeteoInfo
{
    wchar_t* DisplayName;
    wchar_t* UniqueID;
    int Temp;
    bool IsRaining;
    double Humidity;
};

In our WPF C# GUI we would meet that with:

public struct MMeteoInfo
{
// Properties, not fields to serve data binding
    public string DisplayName { get; private set; }
    public string UniqueID { get; private set; }
    public int Temp { get; private set; }
    public bool IsRaining { get; private set; }
    public double Humidity { get; private set; }
}


And this will work.

Then, encouraged by our success, we add two more, but adjacent Boolean fields: IsOperational and IsOnline, which indicate whether the meteo station is known to function properly, and can be reached by internet, respectively. In C++:

struct MeteoInfo
{
    wchar_t* DisplayName;
    wchar_t* UniqueID;
    bool IsOperational;
    bool IsOnline;
    int Temp;
    bool IsRaining;
    double Humidity;
};

And in C#:

public struct MMeteoInfo
{
// Properties, not fields to serve data binding
    public string DisplayName { get; private set; }
    public string UniqueID { get; private set; }
    public bool IsOperational { get; private set; }
    public bool IsOnline { get; private set; }
    public int Temp { get; private set; }
    public bool IsRaining { get; private set; }
    public double Humidity { get; private set; }
}

But now we are in trouble. We create an array of MeteoInfos as:

MeteoInfo m_infos[] =
{
    { L"Meteo1", L"123-123-123", true, true, 25, true, 60.3 },
    { L"Meteo2", L"456-456-456", true, false, 27, false, 81.25 },
    { L"Meteo3", L"789-789-789", false, true, 33, true, 36.7 }
};

And it shows up in the GUI like:

Which is completely wrong!

So, what happened?

Analysis: Struct Memory Layout

From an issue posted a connect.microsoft.com (MS’s feedback site). We learn that:

  • In Marshaling a type with layout from C++, default alignment/padding of types is the same as in C++.
  • Alignment requirement is by default 8 but can be changed using the Pack field on the StructLayoutAttribute.

To complete the picture we should add that:

  • The (minimum) byte size of the bool type has not been defined in C++, so it is implementation dependent. In VC++ sizeof(bool)=1, as it is in C#.

Now let’s take a look at the memory layout of the structure in C++, hence in C# .Net, and compare this with the layout we would expect in C# based on aligned type byte sizes.

Field Byte offset in C++, C# Type Size CLR Aligned type size based offset
DisplayName 0 8 0
UniqueID 8 8 8
Temp 16 4 16
IsRaining 20 1 (padding=3) 20
Humidity 24 8 24
One Past End of struct (size) 32 32 32

So indeed, no problems in sight; the actual offset are equal to the offsets based on aligned managed type sizes.

How did I get these data? The C++ structure memory layout can be read off the Memory window while debugging in VS2013. However, in order to obtain the offset numbers for the C# struct (MMeteoInfo) you have to use a trick, see here: assign each field of a struct object to a suitably typed variable (i.e. var 🙂 ), and evaluate the offset of the source value. (I’m open to suggestions on utilities that show memory layout of complex types in managed memory, how ever volatile.)

When we add two (or more) adjacent Boolean fields, we are in trouble

Field Byte offset in C++, C# Type Size CLR Aligned type size based offset
DisplayName 0 8 0
UniqueID 8 8 8
IsOperational 16 1 16
IsOnline 17 1 20
Temp 20 (aligned at word) 4 24
IsRaining 24 1 28
Humidity 32 (aligned at 8 multiple) 8 32
One Past End of struct(size) 40 40 40

This shows that the two adjacent Boolean fields are packed together in a single word. This is the doing of default marshaling, but clearly the CLR cannot adapt to this.

We can explain, or predict the errors now:

  • An assignment of IsOperational grabs four bytes, so it also copies IsOnline, hence with our initializations the result is always true. Indeed, if we set both to False, IsOperational comes out false too.
  • An assignment of IsOnline also grabs four bytes, so also the first byte of Temp. Temp is positive in our initializations, so IsOnline is always true. Indeed, if we set Temp to zero, IsOnline comes out False.
  • Assignment of Temp really grabs the value of IsRaining at offset 24, so we get to see the value of IsRaining instead of the value of Temp.
  • The value for IsRaining is copied from the empty padding bytes at offset 28, rendering it the value 0.
  • The value or Humidity, a double, is taken from the first multiple of 8 bytes, at offset 32, hence it is correct.

So, now we know the MSIL instructions copy too many bytes, or bytes from the wrong location, how do we repair this error?

Solutions and Non-Solutions

A solution we do not want is to change the C++ code by using #pragma pack(…). #pragma is used to create non-portable code, pack is used to adapt the memory layout of structures. I don’t want to make code non-portable, just because I would like to add a GUI to that code.

Let’s review a number of approaches that might seem reasonable, but in fact will not work.

The MarshalAs Method

We could insert a clause like:

MarshalAs(UnmanagedType.Bool)

However, that one is meant for export of data to C++, targeting the Windows BOOL type, which is four bytes. For our 1 byte bool type we use:

MarshalAs(UnmanagedType.U1)

Then we change the definition of MMeteoInfo so we can marshal the bool variables, if we would like to:

[StructLayout(LayoutKind.Sequential, CharSet = CharSet.Unicode)]
public struct MMeteoInfo
{
    public string DisplayName { get; private set; }
    public string UniqueID { get; private set; }

    [MarshalAs(UnmanagedType.U1)]
    bool isOperational;
    public bool IsOperational
    {
        get { return isOperational; }
        private set { isOperational = value; }
    }

    [MarshalAs(UnmanagedType.U1)]
    bool isOnline;
    public bool IsOnline
    {
        get { return isOnline; }
        private set { isOnline = value; }
    }

    public int Temp { get; private set; }

    [MarshalAs(UnmanagedType.U1)]
    bool isRaining;
    public bool IsRaining
    {
        get { return isRaining; }
        private set { isRaining = value; }
    }

    public double Humidity { get; private set; }
}


But if we run the program, we get an error:

Let’s say this is a marshaling error.

The StructLayoutAttribute.Pack Field

If we set Packing to 4, all our troubles should be over; all fields should start at word boundary. However, mirroring the C++ layout takes precedence – the two Boolean fields keep being marshaled as two adjacent bytes, and we still get the same error message. The same result is obtained for each packing value we may choose.

Use the StructLayout Attribute with LayoutKind.Explicit

So, we cannot change the structure’s memory layout by merely specifying a packing. Next step is to explicitly specify the layout per structure field. If we do so, the definition of the structure becomes like this:

[StructLayout(LayoutKind.Explicit, CharSet = CharSet.Unicode)]
public struct MMeteoInfo
{
    [FieldOffset(0)]
    string displayName;
    public string DisplayName
    {
        get { return displayName; }
        private set { displayName = value; }
    }

    [FieldOffset(8)]
    string uniqueID;
    public string UniqueID
    {
        get { return uniqueID; }
        private set { uniqueID = value; }
    }

    [FieldOffset(16)]
    bool isOperational;
    public bool IsOperational
    {
        get { return isOperational; }
        private set { isOperational = value; }
    }

    public bool IsOnline
    {
        get { return isOperational; }
        private set { isOperational = value; }
    }

    [FieldOffset(20)]
    int temp;
    public int Temp
    {
        get { return temp; }
        private set { temp = value; }
    }

    [FieldOffset(24)]
    bool isRaining;
    public bool IsRaining
    {
        get { return isRaining; }
        private set { isRaining = value; }
    }

    // double gets laid out on a multiple of 8 bytes.
    [FieldOffset(32)]
    double humidity;
    public double Humidity
    {
        get { return humidity; }
        private set { humidity = value; }
    }
}

Note that the property IsOnline does not have a backing field of its own, It shares a backing field with IsOperational. After all, both bools are encoded in these same 4 bytes. This code works, except that IsOperational, and IsOnline are now dependent values.

So, how do we get the correct value for each bool out of the 4 bytes in the isOperational field?

We use a mask and a Boolean bitwise operator, like this:

[FieldOffset(16)]
int booleans;
public bool IsOperational
{
    get
    {
        int mask = 1;
        // The first byte of booleans contains the value of IsOperational
        int tmp = booleans & mask;
        return tmp > 0;
    }
    private set { ; } // dummy
}

public bool IsOnline
{
    get
    {
        int mask = 256;
        // The second byte of booleans contains the value of IsOnline
        int tmp = booleans & mask;
        return tmp > 255;
    }
    private set { ; } // dummy
}

And it works!

Now we have the same values as in the initialization code above.

A WPF GUI for a C++ DLL: A Complex PInvoke Construct

Introduction

Suppose you have a C++ DLL that needs to relay some data and possibly some error messages, and you want to present this data in a graphical user interface (GUI) that is compatible with Windows 7 and up?

Then you have quite some options, among which:

– A win32 GUI in C++.

– A GUI in WPF, connected to the DLL by C++ interop, i.e. managed C++.

– A GUI in WPF, connected to the DLL by PInvoke.

– A GUI in Qt or another 3rd party GUI library for C++.

You might want to choose the option that you are familiar with, and that has a future, also. In my case that is a choice for WPF (familiarity) and PInvoke (has a future). That is, I am not familiar with QT or other 3rd party GUI libraries, and a win32 GUI seems too tedious. I also happen to think that managed C++ is, or will be orphaned. Marshalling (which we use for PInvoke) on the other hand, has been enhanced even in .Net 4.5.1, see e.g. the Marshal.SizeOf<T>() method here.

In this blog post we will explore a WPF GUI that sends a pointer-to-callback to a C++ DLL, which uses the callback to send an array of structures (containing strings) back to the GUI, which the GUI presents to the user by means of data binding. The case will be made for a simple weather forecast system that displays some data from (imaginary) distributed measurements collected by the DLL. We will use a separate callback to allow the DLL to log meta level messages.

The reason for writing this article on PInvoke is that in my research for the solution described here, I found many explanations of advanced PInvoke techniques, but few integrated examples, and even less example of connecting PInvoke to data binding.

So, the software presented here combines a number of advanced PInvoke techniques into a coherent, easy-to-use, functional whole, connected to data binding. The complete example code (a vs2013 x64 solution) can be downloaded using the link at the bottom of this article.

Sources

I will not assert that this article contains substantial original work. It just integrates insights published (abundantly) on the internet. Places to look for adequate information on PInvoke and Marshalling are:

– The MSDN Library on PInvoke and Marshalling.

– Stack Overflow on PInvoke.

Manski’s P/Invoke Tutorial .

Particularly informative articles (to me) were:

A support article by David Stucki on wrapping a C++ class for use by managed code.

An article by JeffB on CodeProject on marshalling a C++ class.

Below we will first explore how to data bind to a string obtained from the DLL, then we will explore the case of an array of structures.

Getting a Log Message String from the DLL by Callback

And data binding it to a TextBlock in the GUI.

In this section we will first review the C++ DLL involved. Then we will discuss the case of obtaining a log message. We will thereby ignore all aspects of the C++ code that have to do with marshalling an array of structures; that will be the subject of the next section.

The Native DLL

The DLL consists of an Interface file of exported symbols, a header file that defines the implementation class, and a cpp file with the implementations.

The DLL interface is defined as follows:

The MeteoInfo structure will be presented in the next section.

We note the logCallback function pointer, the lifetime management functions CreateMeteo and DestroyMeteo, and a Send function that we use to signal the DLL to send data to the WPF GUI using callbacks.

The Header file for the implementation of the interface is as follows.

We see a simple class derived from the Interface. Note the fields, initialized by the constructor, that hold the callback function pointers for local, repeated use.

The cpp implementation file is as follows:

So basically, the Meteo::Send method invokes the log callback (m_lcb) with a wchar_t constant.

Then, what do we need to data bind the result of this call to a TextBlock in the WPF GUI?

WPF GUI: The Logging Text Part

First of all we need to declare that we will use methods from the DLL in the C# code to create a Meteo object that holds a pointer to the log callback, and to signal the DLL to send data to the WPF GUI. In this simple scenario, the DLL responds to invoking the Send method by invoking the callback once, but in a realistic setting the Send method would start a process that repeatedly invokes the callback autonomously – according to its own logic.

The argument for Send is the instance we obtained from CreateMeteo. Obviously (being the argument for CreateMeteo) , we need a delegate called LogDelegate:

Note the CharSet specifier. We need this since the default is ANSI. Next we bind the delegate to an actual method:

Here we copy the native string referred to by the IntPtr pointer to a managed string.

LogString is a property, not a field. We use a property so we can data bind a TextBlock to it. The property is:

The OnPropertyChanged call is part of a standard INotifyPropertyChanged implementation.

The data binding in XAML is just:

And that’s all.

Getting an Array of Structures from the DLL by Callback

The relative simplicity of the above was somewhat surprising to me, since explanations of PInvoking strings, in articles on the internet can be dauntingly complex. The good news is that applying the same pattern to an array of structures, that hold strings as well as other data types, does not lead to much additional complexity.

Recall the C# DLL function declaration that creates a Meteo object:

It also holds a delegate for relaying data that we use to update the GUI. GuiUpdateDelegate is defined as:

The delegate’s parameters are a pointer to a native array, and an int that designates the size of the array.

The array is a simple array of MeteoInfo structures. In order to relay the data we need corresponding structures in C++ and in C# (managed code). The native structure is:

The corresponding managed structure is:

You might expect fields here, instead of properties. We should keep in mind, however, that a property is just some code around a field. If we would define the structure with fields, the size in bytes of an object of the structure would be the same. However, we need (public) properties in order to support data binding.

The delegate specified above is bound to an actual method that produces an array of MMeteoInfo objects:

The Marshal.PtrToStructure method copies the native data into a managed structure.

The InfoList object mentioned in the code above is a ListView defined in XAML

And we’re done. Output from the sample application looks like this:

Link to Sample Code

Sample Code

Data Compression for the Kinect

Transmitting uncompressed Kinect depth and color data requires a network bandwidth of about 460Mbit/s. Using the RleCodec or the LZ4 library we achieve tremendous compression – a compression ratio of 10 or 22 respectively, at lightning speed – over 1600Mbytes/s. We achieve this not so much by the compression algorithms, but by removing undesirable effects (jitter, by the DiscreteMedianFilter) and redundancy (already sent data, by taking the Delta).

Introduction

From the start, one goal of the Kinect Client Server (KCS) project was to provide a version of the KCS viewer, called 3D-TV, from the Windows Store. Because of certification requirement 3.1 (V5.0)

“Windows Store apps must not communicate with local desktop applications or services via local mechanisms,..”

3D-TV has to connect to a KinectColorDepth server application on another PC. In practice, the network bandwidth that is required to transfer uncompressed Kinect depth and color data over Ethernet LAN using TCP is about 460Mbit/s, see e.g. the blog post on the jitter filter. This is a lot, and we would like to reduce it using data compression.

This is the final post in a series of three on the Kinect Client Server system, an Open Source project at CodePlex, where the source code of the software discussed here can be obtained.

What Do We Need?

Let’s first clarify the units of measurements we use.

Mega and Giga

There is some confusion regarding the terms Mega and Giga, as in Megabit.

  • For files 1 Megabit = 2^20 bits, and 1 Gigabit = 2^30 bits.
  • For network bandwidth, 1 megabit = 10^6 bits, and 1 gigabit = 10^9 bits.

Here we will use the units for network bandwidth. The Kinect produces a color frame of 4 bytes and a depth frame of 2 bytes at 30 frames per second. This amounts to:

30 FPS x 640×48 resolution x (2 depth bytes + 4 color bytes) x 8 bits = 442.4 Mbit/s = 55.3 Mbyte/s.

We have seen before that the actual network bandwidth is about 460Mbit/s, so network transport creates about 18Mbit/s overhead, or about 4%.

Since we are dealing with data here that is streamed at 30 FPS, time performance is more important than compression rate. It turns out that a compression rate of at least 2 (compressed file size is at most 50% of uncompressed size), in about 5ms satisfies all requirements.

Data Compression: Background, Existing Solutions

Theory

If you are looking for an introduction to data compression, you might want to take a look at Rui del-Negro’s excellent 3 part introduction to data compression. In short: there are lossless compression techniques and lossy compression techniques. The lossy ones achieve better compression, but at the expense of some loss of the original data. This loss can be a nuisance, or irrelevant, e.g. because it defines information that cannot be detected by our senses. Both types of compression are applied, often in combination, to images, video and sound.

The simplest compression technique is Run Length Encoding, a lossless compression technique. It simply replaces a sequence of identical tokens by one occurrence of the token and the count of occurrences. A very popular somewhat more complex family of compression techniques is the LZ (Lempel-Ziv) family (e.g. LZ, LZ77, LZ78, LZW) which is a dictionary based, lossless compression. For video, the MPEG family of codecs is a well known solution.

Existing Solutions

There are many, many data compression libraries, see e.g. Stephan Busch’s Squeeze Chart for an overview and bench marks. Before I decided to roll my own implementation of a compression algorithm, I checked out two other solutions: The Windows Media Codecs In Window Media Foundation. But consider the following fragment from the Windows Media Codecs documentation:

It seems as if the codecs are way too slow: max 8Mbit/s where we need 442Mbit/s. The WMF codecs obviously serve a different purpose.

The compression used for higher compression levels seems primarily of the lossy type. Since we have only 640×480 pixels I’m not sure whether it is a good idea to go ‘lossy’. It also seems that not all versions of Windows 8 support the WMF.

LZ4, an open source compression library. This is a very fast compression library, see image below, from the website:

So, LZ4 can compress a file to 50% at over 400MByte/s. That is absolutely great! I’ve downloaded the source and tried it on Kinect color and depth data. Results are shown and compared in the Performance section.

The RleCodec

I decided to write my own data compression codec, and chose the Run Length Encoding algorithm as a starting point. Why?

Well, I expected a custom algorithm, tailored to the situation at hand would outperform the general purpose LZ4 library. And the assumption turned out to be correct. A prototype implementation of the RleCodec supported by both the DiscreteMedianFilter and creating a Delta before compressing data really outperformed the LZ4 reference implementation, as can be read from the performance data in the Performance section.

It only dawned on me much later that removing undesired effects (like jitter, by the DiscreteMedianFilter) and redundant information (already sent data, by taking the Delta) before compressing and transmitting data is not an improvement of just the RLE algorithm, but should be applied before any compression and transmission takes place. So, I adjusted my approach and in the performance comparison below, we compare the core RLE and LZ4 algorithms, and see that LZ4 is indeed the better algorithm.

However, I expect that in time the data compression codec will be implemented as a GPU program, because there might be other image pre-processing steps that will also have to be executed at the GPU on the server machine; to copy the data to the GPU just for compression requires too much overhead. It seems to me that for GPU implementations the RLE algorithm will turn out the better choice. The LZ4 algorithm is a dictionary based algorithm, and creating and consulting a dictionary requires intensive interaction with global memory on the GPU, which is relatively expensive. An algorithm that can do its computations purely locally has an advantage.

Design

Lossless or Lossy

Shall we call the RleCodec a lossy or lossless compression codec? Of course, RLE is lossless, but when compressing the data, the KinectColorDepth server also applies the DiscreteMedianFilter and takes the Delta with the previous frame. Both reduce the information contained in the data. Since these steps are responsible for enormous reduction of compressed size, I am inclined to consider the resulting library a lossy compression library, noting that it only looses information we would like to lose, i.e. the jitter and data we already sent over the wire.

Implementation

Algorithm

In compressing, transmitting, and decompressing data the KinectColorDepth server application takes the following steps:

  1. Apply the DiscreteMedianFilter.
  2. Take the Delta of the current input with the previous input.
  3. Compress the data.
  4. Transmit the data over Ethernet using TCP.
  5. Decompress the data at the client side.
  6. Update the previous frame with the Delta.

Since the first frame has no predecessor, it is a Delta itself and send over the network as a whole.

Code

The RleCodec was implemented in C++ as a template class. Like with the DiscreteMedianFilter, traits classes have been defined to inject the properties that are specific to color and depth data at compile time.

The interface consists of:

  • A declaration that take the value type as the template argument.
  • A constructor that takes the number of elements (not the number of bytes) as an argument.
  • The size method that returns the byte size of the compressed data.
  • The data method that returns a shared_ptr to the compressed data.
  • The encode method that takes a vector of the data to compress, and stores the result in a private array.
  • The decode method that takes a vector, of sufficient size, to write the decompressed data into.

Like the DiscreteMedianFilter, the RleCodec uses channels and an offset to control the level of parallelism and to skip channels that do not contain information (specifically, the A (alpha or opacity) channel of the color data). Parallelism is implemented using concurrency::parallel_for from the PPL library.

Meta Programming

The RleCodec contains some meta programming in the form of template classes that roll out loops over the channels and offset during compilation. The idea is that removing logic that loops over channels and checks if a specific channel has to be processed or skipped will provide a performance gain. However, it turned out that this gain is only marginal (and a really thin margin 🙂 ). It seems as if the compiler obviates meta programming, except perhaps for very complicated cases.

Performance

How does our custom RLE codec perform in test environment and in the practice of transmitting Kinect data over a network? How does its performance compare to that of LZ4?. Let’s find out.

In Vitro Performance

In vitro performance tests evaluate in controlled and comparable circumstances the speed at which the algorithms compress and decompress data.

Timing

In order to get comparable timings for the two codecs, we measure the performance within the context of a small test program I wrote, the same program is used for both codecs. This makes the results comparable and sheds light on the usefulness of the codec in the context of transmitting Kinect data over a network.

Algorithm

In comparing the RleCodec and LZ4, both algorithms take advantage of working the delta of the input with the previous input. We use 3 subsequent depth frames and 3 subsequent color frames for a depth test and a color test. In a test the frames are processed following the sequence below:

  1. Compute delta of current frame from previous frame.
  2. Compress the delta.
  3. Measure the time it takes to compress the delta
  4. Decompress the delta
  5. Measure the time it takes to decompress the delta
  6. Update previous frame with the delta
  7. Check correctness, i.e. the equality of the current input with the updated previous input.

We run the sequence 1000 times and average the results. Averaging is useful for processing times, the compression factor will be the same in each run. The frames we used are not filtered (DiscreteMedianFilter).

Let’s first establish that the performance of these libraries are of very different order than the performance of the WMF codecs. Let’s also establish that compression speed and decompression speed is much more than sufficient: as noted above 50Mbyte/s would do.

For depth data, we see that the RleCodec delivers fastest compression. LZ4 delivers faster decompression, and obtains stronger compression.

The RleCodec was tested twice with the color data. In the first test we interpreted the color data as of type unsigned char. We used 3 channels with offset 4 to compress it. In the second test we interpreted the color data as unsigned int. We used 4 channels, with offset 4. We see that now the RleCodec runs about 4 times as fast as with char data. The compression strength is the same, however. So, for color data, the same picture arises as with depth data: times are of the same order, but LZ4 creates stronger compression.

The difference in naked compression ratios has limited relevance, however. We will see in the section on In Vivo testing that the effects of working with a Delta, an in particular of the DiscreteMedianFilter dwarfs these differences.

We note that the first depth frame yields lesser results both for time performance and compression ratio. The lesser (de)compression speed is due to the initialization of the PPL concurrency library. The lesser compression ratio is illustrative of the effect of processing a Delta: the first frame has no predecessor, hence there is no Delta and the full frame is compressed. The second frame does have a Delta, and the compression ratio improves by a factor of 2.4 – 2.5.

In Vivo Performance

In Vivo tests measure, in fact, the effect of the DiscreteMedianFilter on the data compression. In Vivo performance testing measures the required network bandwidth in various configurations:

  1. No compression, no filter (DiscreteMedianFilter).
  2. With compression, no filter.
  3. With compression, with filter, with noise.
  4. With compression, with filter, without noise.

We measure the use of the RleCodec and the LZ4 libraries. Measurements are made for a static scene. Measuring means here to read values from the Task Manager’s Performance tab (update speed = low).

Using a static scene is looking for rock bottom results. Since activity in the scene- people moving around can be expressed as a noise level, resulting compression will always be somewhere between the noiseless level and the “no compression, no filter” level. Increase will be about linear, given the definition of noise as a percentage of changed pixels.

The measurements in the table below are in Megabits per second, whereas the table above shows measurements in Megabytes per second. So, in order to compare the numbers, if so required, the entries in the table below have to be divided by 8. Note that 460Mbit/s is 57.5Mbyte/s.

What we see is that:

  • Compression of the delta reduces network bandwidth width 13* (RLE), or 33% (LZ4).
  • Application of the filter reduces it further with 53% (RLE), or 39% (LZ4).
  • Cancelling noise reduces it further with 24% (RLE), or 23% (LZ4).
  • We end up with a compression factor of about 10 (RLE), or 22 (LZ4).

:-).

What do we transmit at the no noise level? Just the jitter beyond the breadth of the DiscreteMedianFilter, a lot of zeroes, and some networking overhead.

As noted above, the differences between the core RleCodec and LZ4 are insignificant compared to the effects of the DiscreteMedianFilter and taking the Delta.

Conclusions

Using the RleCodec or the LZ4 library we achieve tremendous compression, a compression ratio of 10 or 22 respectively , at lightning speed – over 1600Mbytes/s. We achieve this not so much by the compression algorithms, but by removing undesirable effects (jitter, by the DiscreteMedianFilter) and redundancy (already sent data, by taking the Delta).

ToDo

There is always more to wish for, so what more do we want?

Navigation needs to be improved. At the moment it is somewhat jerky because of the reduction in depth information. If we periodically, say once a second, send a full (delta yes, filter no) frame, in order to have all information at the client’s end, we might remedy this effect.

A GPU implementation. Compute shader or C++ AMP based. But only in combination with other processing steps that really need the GPU.

Improve on RLE. RLE compresses only sequences of the same token. What would it take to store each literal only once, and insert a reference to the first occurrence at reencountering it? Or would that be reinventing LZ?

A Jitter Filter for the Kinect

This blog post introduces a filter for the jitter caused by the Kinect depth sensor. The filter works essentially by applying a dynamic threshold. Experience shows that a threshold works much better than averaging, which has the disadvantage of negatively influencing motion detection, and has only moderate results. The presented DiscreteMedianFilter removes the jitter. A problem that remains to be solved is the manifestation of depth shadows. Performance of the filter is fine. Performance is great in the absence of depth shadow countermeasures.

Introduction

Kinect depth images show considerable jitter, see e.g. the depth samples from the SDK. Jitter degrades image quality. But it also makes compression(Run Length Encoding) harder; compression for the Kinect Server System will be discussed in a separate blog post. For these reasons we want to reduce the jitter, if not eliminate it.

Kinect Depth Data

What are the characteristics of Kinect depth data?

Literature on Statistical Analysis of the Depth Sensor

Internet search delivers a number of papers reporting on thorough analysis of the depth sensor. In particular:

[1] A very extensive and accessible technical report by M.R. Andersen, T. Jensen, P. Lisouski, A.K. Mortensen, M.K. Hansen, T. Gregersen and P. Ahrendt: Kinect Depth Sensor Evaluation for Computer Vision Applications.

[2] An also well readable article by Kourosh Khoshelham and Sander Oude Elberink.

[3] A more technically oriented article by Jae-Han Park, Yong-Deuk Shin, Ji-Hun Bae and Moon-Hong Baeg.

[4] Of course, there is always the Wikipedia

These articles discuss the Kinect 360. I’ve not found any evidence that these results do not carry over to the Kinect for Windows, within the range ([0.8m – 4m]) of the Default mode.

Depth Data

We are interested in the depth properties of the 640×480 spatial image that the Kinect produces at 30 FPS in the Default range. From the he SDK documentation we know that the Kinect provides depth measurements in millimeters. A dept value measures the distance between a coordinate in the spatial image and the corresponding coordinate in the parallel plane at the depth sensor, see image below from the Kinect SDK Documentation.

Some characteristics:

1. Spatial resolution: at 0.8m the 640×480 (width x height) depth coordinates cover an approximately 87cmx63cm plane. The resolution is inversely proportional with the squared distance from the depth sensor. The sensor has an angular field of view of 57° horizontally and 43° vertically.

2. Depth resolution: the real world distance between 2 subsequent depth values the Kinect can deliver is about 2mm at 1m from the Kinect, about 2.5cm at 3m, and about 7cm at 5m. Resolution decreases quadratically as a function of the distance.

Jitter

The Kinect depth measurements are characterized by some uncertainty that is expressible as a random error. One can distinguish between errors in the x,y-plane on the one hand, and on the z-axis (depth values) on the other hand. It is the latter that is referenced to as the depth jitter. The random error in the x,y-plane is much smaller than the depth jitter. I suspect it manifests itself as the color jitter in the KinectColorDepthServer through the mapping of color onto depth, but that still has to be sorted out. Nevertheless, the filter described here is also applied to the color data, after mapping onto depth.

The depth jitter has the following characteristics:

1. The error in depth measurements: The jitter is about a few millimeters at 0.5m, up to 4cm at 5m, increasing quadratically over the distance from the camera.

2. The jitter is a walk over a small number of nearby discrete values. We have already seen this in a previous post in The Byte Kitchen Blog, where we found a variance over mainly 3 different values, and incidentally 4 different values. Of course, for very long measuring times, we may expect an increased variance.

3. The jitter is much larger at the boundaries of depth shadows. Visually, this is a pretty disturbing effect, but the explanation is simple. The Kinect emits an infra red beam for depth measurements which, of course, creates a shadow. The jitter on the edges of a depth shadow jumps from an object to its shadow on the background which is usually much further away. We cannot remove this jitter without removing the difference between an object and its background, so for now, I’ve left it as is.

The miniature below is a link to a graph in [2] (page 1450, or 14 of 18) of the depth resolution (blue) and size of the theoretical depth measurement error (red).


A Kinect Produces a Limited Set of Discrete Depth Values

It is not the goal of the current project to correct the Kinect depth data, we just want to send it over an Ethernet network. What helps a lot is, and you could see this one coming:

The Kinect produces a limited set of depth values.

The Kinect for Windows produces 345 different depth values in the Default range, not counting the special values for unknown, and out of range measurements. The depth values for my Kinect for Windows are (divide by 8 to get the depth distance in mm):

This is the number of values for the Kinect for Windows. I also checked the number of unique values for my Kinect 360, and it has a larger but also stable set of unique depth values. The number of depth values is 781, due to the larger range.

The fact that a Kinect produces a limited and small set of depth values makes live a lot easier: we can use a lookup table were we would otherwise have to use function approximation. The availability of a lookup table is also good news for the time performance of the filter.

A question might be: can you use the depth table of an arbitrary Kinect to work with any other Kinect? I assume that each Kinect has a slightly different table, and this assumption is based on the fact that my Kinect for Windows has slightly different values than my Kinect 360, for the same sub range. However, if you use an upper bound search (this filter uses std::upper_bound), you will find the first value equal to or larger than a value from an arbitrary Kinect, which will usually be a working approximation (better than having the jitter). Of course, an adaptive table would be better, and it is on the ToDo list.

Design

I’ve experimented with several approaches: sliding window of temporal averages, Bilateral Filter. But these were unsatisfactory:

– Reduction of Jitter is much less good compared to applying a threshold.

– Movement detection is as much reduced as the jitter, which is an undesirable effect.

A simple threshold, of about the size of the breadth of the error function proved the best solution. As noted above, the jitter typically is limited to a few values above and below the ‘real’ value. We could call the ‘real’ value the median of the jitter range, and describe this jitter range not in terms of the depth values themselves but of the enumeration of the sorted list of discrete depth values (see table). We get a Discrete Median Filter if we map all discrete values within the range onto the median of that range (minding the asymmetry of the sub ranges at the boundaries of our sorted list).

The DiscreteMedianFilter Removes Jitter

In practice we see no jitter anymore when the filter is applied: The DiscreteMedianFilter ends the jitter (period). However, the filter is not applicable to (edges of) depth shadows.

Noise

Actually, it turned out that this filter is in fact too good. If the Kinect registers a moving object, we get a moving depth shadow. The filter cannot deal with illegal depth values, so we are stuck with a depth shadow smear.

A modest level of noise solves this problem. In each frame 10% of the pixels the filter skips is selected at random, and updated. This works fine, but it should be regarded as a temporal solution: the real problem is, of course, the depth shadow, and that should be taken up.

Implementation

The Discrete Median Filter was implemented in C++, as a template class, with a traits template class (struct, actually); one specialization for the depth value type and one specialization for the color value type, to set the parameters that are typical for each data type, and a policy template which holds the variant of the algorithm that is typical for the depth and color data respectively. For evaluation purposes, I also implemented traits and policy classes for unsigned int.

So, the DiscreteMedianFilter class is a template that takes a value type argument. Its interface consists of a parameter free constructor and the Filter method that takes a pointer to an input array and a pointer to a state. The method changes the state where the input deviates from the state more than a specified radius.

Channels and Offset

Color data is made up of RGBA data channels: e.g. R is a channel. Working with channels is inspired on data compression. More on this subject in the blog post on data compression.

The advantages of working with channels for the DiscreteMedianFilter are:

1. We can skip the A channel since it is all zeroes

2. Per channel, changes of color due to sensor errors are usually expressible as small changes, which is not the case for the color as a whole, so we get better filtering results.

3. There are less values: 3 x 256 vs 2^32, so the probability of equal values is higher.

Note that the more values are found to be within the range of values that do not need change, the better time performance we get.

The individual channels are not processed in parallel (unlike in the compression library). We will show below that parallelism should not be required (but actually is, as long as we have noise).

Code

The code is complex at points, so it seems to me that printing the code here would raise more questions than it would answer. Interested people may download the code from The Byte Kitchen Open Sources at Codeplex. If you have a question about the code, please post a comment.

Performance

How much space and time do we need for filtering?

A small test program was built to run the filter on a number of generated arrays simulating subsequent depth and color frames. The program size never gets over 25.4 megabytes. The processing speed (without noise) is:

– About 0.77ms for an array of 1228800 bytes (640×480=307200 ARGB color values); 1530Mbyte/s

– About 0.36ms for an array of 640×480=307200 unsigned short depth values; 1615Mbyte/s.

So, this is all very fast, on a relatively small footprint: in a little more than 1ms we have filtered both the depth and the color data of a Kinect frame.

The simple test program and its synthetic data are not suitable for use with noise. So, we measured the time the KinectColorDepthServer needs for calls to the DiscreteMedianFilter. In this case the noise is set at 10% of the values that would otherwise be skipped. The times below are averaged over 25,000 calls:

– Depth: 6.7ms per call.

– Color: 19.3ms per call.

So, we may conclude that the noise is really a performance killer. Another reason to tackle the depth shadow issue. Nevertheless, we are still within the 33ms time window that is available for each frame at 30 FPS.

Does the DiscreteMedianFilter has any effect on the required network capacity? No, in both cases a capacity of 460Mbit/s is required for a completely static scene, compression is off. I do have the impression that the filter has a smoothing effect on instantaneous (as opposed to average) required network capacity.

To do

There is always more to wish for, so what more do we want?

– Resolve the need for the noise factor, i.e. do something about the depth shadows. This will increase performance greatly.

– Because of filtering, navigation through the scene is jerky. There are much less depth values in the image, so movement is not so smooth. This is to be helped by sending a full depth image every now and then. After all, the filter only replaces values that differ more than a threshold, the rest of the image is retained. Refreshing the overall picture now and then retains the richness of the depth image, helps to make noise superfluous, and smoothes navigation.

– Make the table of depth values adaptive. If a value is not present we replace the nearest value. Of course, we would then also like to save the new table to file, and load it at any subsequent program starts.

Kinect Client Server System V0.2

The Kinect Client Server System V0.2 adds the possibility to V0.1 to watch Kinect Color and Depth data over a network, and to navigate the rendered 3D scene.

To support data transfer over TCP, the Kinect Client Server System (KCS system) contains a custom build implementation of Run Length Encoding compression.

To both maximize compression and improve image quality the KCS system uses a jitter filter

Introduction

Version 0.1 of the KCS system allowed the display of Kinect data in a Windows Store app. This is a restricted scenario: for security reasons, a Windows Store app cannot make a network connection to the same PC it is running on, unless in software development scenarios. Version 0.2 overcomes this restriction by:

1. Support for viewing Kinect data from another PC.

2. Providing the 3D-TV viewer from the Windows Store (free of charge).

Of course, V0.2 is an open Source project, the code and binaries can be downloaded from The Byte Kitchen’s open Source project at CodePlex.

Usage

The easiest way to start using the KCS system v0.2 is to download 3D-TV from the Windows Store, navigate to the Help-About screen (via the ‘Settings’ popup), click on the link to the online manual and follow the stepwise instructions.

The general usage schema is depicted below.

The PC called Kinect server runs the KinectColorDepthServer application. In order for the client PC running 3D-TV to find the server PC on the network, the server PC must be connected to gigabit Ethernet (cabled computer network, say) with a network adapter carrying the IP address 192.168.0.20. The IP address of the Ethernet adaptor of the PC running 3D-TV must satisfy 192.168.0.xxx, where 0 <= x <=255. It is wise to expect that required data capacity is well over 100Megabit/second.

The online manual also provides a complete description of the keyboard keys to be used for navigating around a Kinect scene.

More information

In a few more blog posts, I will discuss more technical details of the new features in the KCS system V0.2, specifically the jitter filter that is to stabilize the Kinect imagery and help in data compression, and the data compression itself.

CX Reconsidered [3]: Components on a Thread

This is a series of blog posts that explore programming tactics which ascertain ‘a thin layer of CX’, as advertised and advised by Microsoft, and that thus maximize the use of ISO C++11(+).

This installment is about different approaches to having a component do its own thread management, and starts off by looking at various ways an application can be started up – assuming that different startup mechanics will lead to different ownership relations between an application and a component, hence different approaches to thread management.

This installment also considers some idioms involving C++11 concurrency, as defined in <thread> and <mutex>.

Introduction

It has been argued earlier in this series that threads are a vehicle by which CX dependencies, hence CX code constructs, propagate through your code. To stop this propagation (and preserve portability) we would like the Core component (the ISO C++ only area) to manage its own threads, and to run its operations on the threads its manages. This implies, so it seems, that for starters a component should not be instantiated on a CX thread.

We will consider several alternatives for starting a Xaml + CX application and find that one alternative stands out. We then discuss two models for thread management, and select the best fit. Finally we will walk through an example program.

Alternative Main() Functions

Each CX application has, just like each C# application, a main() function. In CX applications, the main() function is located in <Project Directory>Generated FilesApp.g.hpp, and it is decorated with “#ifndef DISABLE_XAML_GENERATED_MAIN”. So, if you as a developer define DISABLE_XAML_GENERATED_MAIN, and provide a custom main() function, your main() function will be called.

Steps to move to a custom main() function:

1. Add “#define DISABLE_XAML_GENERATED_MAIN” to the pch.h file.

2. Copy the main function from the App.g.hpp, to have a starting point.

3. Add a file, e.g. Main.cpp with the following code:

4. Then edit the main() function to suit your needs.

The standard main() function starts the Xaml application and instantiates an App class.

It is a conceivable scenario that along the App class a component is initialized, and a handle is passed to the App. The other way round is conceivable also: a handle to the App is passed to the Component.

Enumerating the alternatives systematically results in the following list, assuming that the component has an interface called ComponentClass:

1. Xaml owns all. The standard main() function instantiates the App class. In turn the App class instantiates the ComponentClass. Recall that App.g.hpp is generated, we cannot edit it meaningfully to initiate the ComponentClass.

2. Xaml owns the App. The standard main() function instantiates the App class, and calls a factory method in the component which instantiates the ComponentClass on a new thread.

3. App owns all. A custom main() function instantiates the Xaml UI, the App class and the ComponentClass, preferably on two threads.

4. App owns Xaml. A custom main() function instantiates the Xaml UI and the App class, and calls a factory method in the component which instantiates the ComponentClass on a new thread.

To have ownership means (here) to control the life cycle.

So, the summarize: using the standard main() function implies the Xaml UI owns the App class. Using a custom main() function implies the application owns the Xaml UI. In both cases there are two alternatives concerning ownership of the component: the owner also owns the component, or the component owns itself.

Central ownership reduces the number of threads involved, which simplifies data exchange. Decentralized ownership improves process stability, portability, and it keeps the CX layer thin.

We are primarily interested in alternatives in which the component does its own thread management, i.e. alternative 2. and 4. We conclude that a custom main() function does not add a relevant shift in ownership for our purposes and choose alternative 2. because it is simpler than 4.

Active Object or Asynchronous Programming?

How do you implement a component that runs on its own thread(s)? Well, I did some research and contemplated a bit on what I found, and now think there are two major approaches: the Active Object Pattern (Douglas C. Schmidt et al.), and some form of an Asynchronous Programming Model.

The Active Object Pattern

Central in this pattern by is a scheduler that dispatches methods corresponding to request messages on a queue that originated at external clients. Method execution can be asynchronous. (the image is a hyperlink to its source)

The following example implementation of the scheduler is proposed in the article (image is hyperlink):

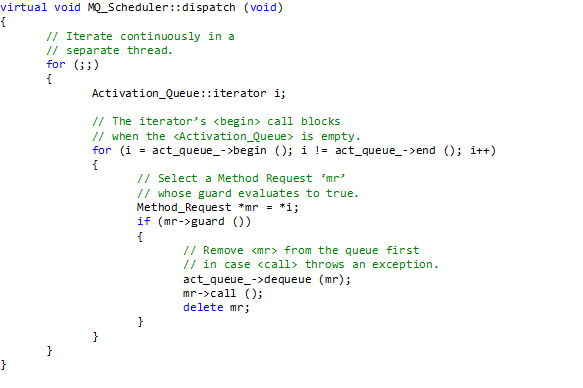
As the comment in the code above mentions: the scheduler runs on its own thread.

What to think of this? To me it seems the Active Object pattern is a very thorough but heavyweight solution. I think it is less suitable for the current challenge. Central in the pattern is a message processing loop, that continuously consumes processor cycles. This is a solution for an environment that lacks just this kind of infrastructural facilities. Windows, iOS, OSX, Linux, or Android GUI platforms are not such type of environments; they (still) have a message loop that continuously consumes processor cycles. To me it seems better to keep it at one such a glutton.

Recently I also stumbled upon a criticism by Bjarne Stroustrup. In his keynote at Going Native 2013 he classified a central scheduler as a performance bottleneck; he sketched a scenario of a significant number of potent parallel processors waiting for this one scheduler to provide some work from a well stocked queue.

So, we would like a solution that is more of a flyweight, and inherently concurrent as well.

A Singleton of Asynchronous Methods

A Singleton class is a pretty perfect implementation of the concept of Component. In C++ it gets instantiated at first use, and gets destructed at program termination. If so required, a reset method can be implemented that returns the state of the object to startup values. In a sense you could say that a Singleton holds its own destiny, just like an Active Component eating away cycles. The Singleton does this by holding a private static handle to its single object. No other entity (except friends, if any) can get to it.

The advantage of a Singleton over an Active Component is in particular (in this discussion) that it does not consume any processor cycles when not executing any tasks. Moreover, it can be made concurrent to any required extent. Here we will propose an asynchronous programming (callback variant) approach. So, we cannot say that the component runs on its own thread; there is no ‘engine’ explicitly running in the component. But, we do can say that the component does its own thread management if it is capable of running its operations on threads it controls.

Some Details

Operations in the context of GUI driven programs generally are functions, properties (get, set methods) and callbacks (event handlers).

In implementing IoC with DI we will implement an asynchronous method call as an interface method that delegates the work to be done to another thread, that provides a callback to return results or error information (the caller has to provide the callback), and then immediately returns.

Events can be raised on either the component generated thread an event raising operation is running on, or on a dedicated thread.

The get and set methods implementing properties should, I think, be so simple to not warrant asynchronism. These simple methods, primarily only getting an setting private fields, do should synchronize access to the fields they interface to.

A component as described here may require a substantial amount of threads, in little time. In order to be able to provide these threads timely, the component may maintain a thread pool, or rather, a thread queue where it keeps a stock of ready to use threads.

The following example might seem an overkill of asynchronicity. In that case it is important to keep three statements in mind:

1. This is the era of asynchronous programming. So , programming constructs that provide asynchronicity will be visible.

2. The example is densely filled with asynchronous constructs due to its instructive nature.

3. The exemplified class is an interface class. It is responsible for thread management, hence a focal point of asynchronous constructs. It thus frees other classes, deeper in the component from such constructs.

Example Application

To show the above described principles at work, we will present a demo application. This demo application centers around a Joke-of-the-Day component. You can:

– Request a random joke from the seemingly endless collection of jokes available to the component (property get() function).

– Add a joke to the collection (property set() function). When you add a joke to the collection, interested subscribers immediately are send your joke (raising an event).

– Request a stand-up session. During a client specified period, jokes are presented at small random intervals (string callback). The time remaining for the session is reported at fixed intervals (primitive type callback).

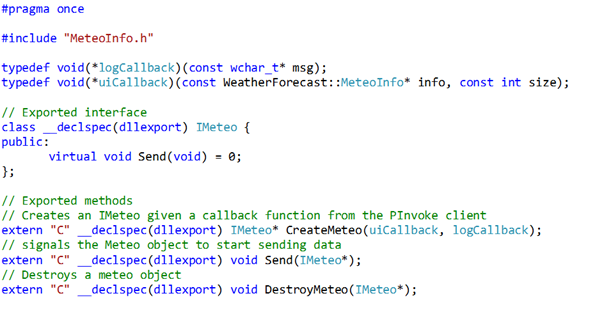
The component is an ISO C++ static lib, suitable for use in a CX component or app.

The complete example application is available from here. In this section we explore a few highlights dealing with lifecycle management and thread management.
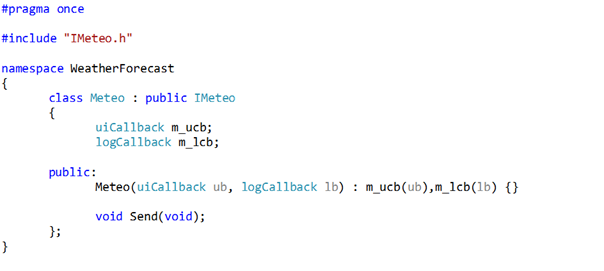
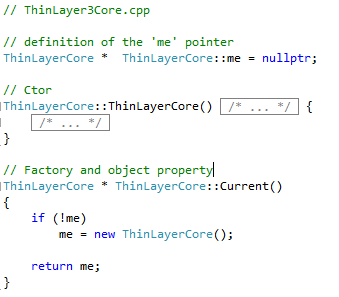
Singleton Pattern

As developed above, the component manages its own lifecycle, but the component does not run on a thread. Below is the singleton class. Just the parts relating to the singleton mechanics are shown. Since the ‘me’ pointer is private, the class’ object dies with the program.

The class implementation, simple as can be.

Asynchronous Method with Callback (IoC with DI)

Consider the following method:

The methods receives three arguments:

– Duration of the session.

– Callback for returning jokes to caller.

– Callback to report progress to caller.

First the method defines a lambda expression f. It is this lambda that does the work. Since every call of this method creates a new lambda object, we don’t need to synchronize access to this code.

The lambda:

– puts the current thread to sleep for a little while.

– Returns a joke (from the seemingly endless collection) using the inserted callback.

– Reports progress by setting a property. Access to this property has to be synchronized, as will be shown below.

– Returns the progress using the inserted callback.

Next the method creates a new thread for the lambda to run on.

Finally the method detaches the thread and returns to the caller. Now the thread runs in the background and is cleaned up by the system after termination. The thread will call on the caller with results, when it has them, using callbacks inserted by the caller. This is how IoC by DI is implemented here.

Now provisions for error handling has been added here. But the lambda could contain a try – catch construct. In addition, we could define a callback output parameter of type std::exception that the callback could throw if not void at return. The lambda can then just send a caught exception to the caller using the callback.

Property with Synchronized Access to Field

The STL contains a *very* elegant mechanism to synchronize access. Consider the following code:

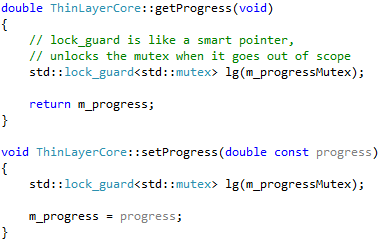
We need only three extra lines of code to completely synchronize access to the m_progress field. One line to declare the mutex, and two lines to lock the field, one time when setting it, one time when reading it.

The great thing of a lock_guard is that it releases its mutex when it goes out of scope. Most elegant!

Events

The same techniques return in our event implementation. Consider the following code:

We have a vector of type newJokeEventHandler, which is a typdef of a std::function object that wraps a pointer to a void function that takes a string argument. Access to the vector is synchronized with a mutex. When an event handler is added, it is added to the end of the vector. When removed, we take care to not disrupt the order in the vector, because the token we returned to the caller is an index into the vector by which we remove it.

An event is raised e.g. in the setter of the ‘JokeOfTheDay’ property:

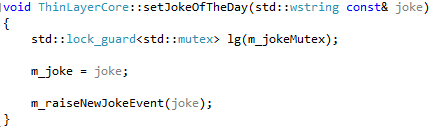
The m_raiseNewJokeEvent returns immediately since it is asynchronous, thus releasing the joke for reading and further updates.

In Conclusion

We have seen that a C++ component that holds its own lifetime and manages its thread can be easily developed. We do not need CX for this, the resulting code is portable. The resulting component is indeed flyweight – because of the elegant constructs provided by the STL for managing threads, and also because the component doesn’t consume any processor cycles when not processing anything. Indeed, applying the sizeof operator to a thread, mutex, or lock_guard yields 4 (x the size of a char) in each case, i.e. they all are minimum size handles to system resources.

Building a Midrange PC

For some time now, my children are complaining about their PCs. The systems fail when playing The Sims, editing videos, and playing some online games. In particular, the failure to do online games triggered me.

It is clear, the kids need new PCs, and these PCs have to satisfy the requirements stated below.

Requirements

Identical PCs for all Kids

All children need to get the same PC. Otherwise there will noticeable unfairness, hence noticeable drama.

Different PC for Each Kid

On the other hand, each kid has its own special wishes, and its PC needs to be customizable to accommodate these wishes (within reasonable limits).

We solve this paradox by delivering equal basis systems to all children. Each kid can then use its own savings to customize its PC.

Future Proof

The PCs need to be future proof. That is, not composed of outdated components. And we also want the parts that will last long to be of excellent quality.

Silent

The PCs need to be quiet. Except perhaps at incidental extreme performances. Well audible PCs are very irritating. I myself have some frequency dips in my hearing, due, I think, to learning to suppress the PC noise of early PCs, during more than just a couple of years.

Energy Consumption

A new PC should consume less energy than an older one. That should be obvious.

Component Re-Use

For some odd reason we’re drowning is displays, mice and keyboards, all well -re-usable. We can also strip the DVD writers (readers) from the old PCs. Look, DVD writers are hardly ever used, so, although they are very cheap (€ 15,-), we will not spend money on new DVD writers.

The new PCs also need a backup facility. We will use the hard disks of my old NAS, by now retired, as backup disks. These disks are IDE disks; too slow for primary use, but since each has a capacity of 500Gb, ok for backup purposes.

Affordable

You would almost forget it, but a PC also need to be affordable. For a start we will assume a focus point of € 500,- per PC. Enough for quality, too little for indulgence :-).

Starting Points

Our starting point will be the desktop-best-buy-guide of September 2013 on Tweakers.net (in Dutch), in particular the basic and mainstream game systems. Game Systems are much like media systems, the main difference being overclocking. We are aiming at a basic-to-main media and / or game system.

This best buy guide provides us with the expertise available at the forums (for a), especially in the discussions concerning the components to choose. From the proposed system we pick the parts we like or choose alternatives that seem more appropriate given more or other information.

A very nice aspect of the Tweakers.net site is that we can directly see what the prices are in a broad spectrum of shops. An alternative source of advice and prices is hardware.info.

Components

Processor

With respect to processor choice, the Tweakers.net site is at the moment just the place to be. There has been a heated discussion concerning the choice between the AMD FX-8320 Black Edition and the Intel Core i5 4670K Boxed Haswell processors. I will explain the difference by motivating my preference.

The AMD processor is a bit dated. Its successor will be launched in the near future. This fact lowers its price to a great value-for-money level: The average performance level of the processors is comparable, but a current combination of processor and mother board is in case of the AMD processor about € 100,- lower. So, would you be willing to sacrifice the “future proof” requirement for € 100,-? I will not.

A number of arguments plead in favor of the Intel processor:

– It is recent; on the Dutch market only since June 2013.

– It is designed to save energy.

– It uses a new socket that we hope will be current for a while, so we might replace the processor by a successor without also having to replace the motherboard (that holds the socket).

– Very importantly: it has an internal graphical processor (igp). This igp is strong enough to run the previous generation of most-resource-hungry games, at not-the-highest-quality level, that is, it is excellent for your daily use. The AMD processor does not have an igp, so you will always have to buy a graphics card – that’s your € 100,- price advantage.

– The Intel processor is tested to have better performance in applications of video processing, so the Intel processor contributes to that requirement.

One final point. The processor proposed by Tweakers’ is of “K” type: suitable for overclocking. Overclocking can damage your processor and other hardware. So, this is not a facility we will hand over to (inquisitive) children. Our choice is therefore the Intel Core i5 4670 Boxed, without the “K”. This saves us some € 10,-.

Mother Board

Tweakers.net proposes the Gigabyte GA-Z87-HD3 mother board. This is a Z87 chipset mother board. For the new Haswell processor there are three different chipsets: Z87 for overclockers, H87: for mainstream systems, B87: with the ‘B’ of budget. So, we don’t want a Z87 board, we want a H87 board, which will (no doubt) be cheaper.

We prefer the ASRock Fatal1ty H87 Performance over the price comparable Gigabyte H87 board. The reason is that the ASRock has a better sound system: newer chip, pre-amplifier for headphones, connector for a surround system amplifier. It has also an newer LAN network chip, and it is a bit cheaper. Compared to the Gigabyte it has less precise control over the cooling fans, but we were not planning to get continued maximum performance from these PCs anyway. I suspect that a comparable H87 Gigabyte board will be a micro ATX board, a very small board. I consider that a disadvantage since it requires extra cooling measures.

The Dutch Hardware.info site has published an extensive evaluation of Haswell motherboards, see it for many more details. Perhaps this same evaluation has been published at other Hardware.info sites as well.

PC Case

At this point I really passed by the Tweakers list. AnandTech.com also reviews PC cases. Their regular guy is fond of the Nanoxia PC cases. Nanoxia is a somewhat high end brand for PC cases. They provide heavy, strong, silent and very good looking cases. And in three colors. Real thorough, sound German engineering.

I really like the lasting, silent and esthetic character of this case. It could easily last for 20 years, hold many successive PCs, and never be the rotten apple of your interior.

The preferred model is the Nanoxia Deep Silence 2. It is smaller than the Deep Silence 1, which we consider an advantage. An alternative would be the Corsair 330R. However, this case is a step back in all aspects (according to AnandTech), and available in any color … as long as its black.

Other Components

The other components we choose following the Tweakers.net list are:

– RAM memory

– Hard disk

– Power Supply

Both Tweakers’ lists suggest the same RAM memory and hard disk. We choose a modular power supply from the suggested alternatives. ‘Modular’ means that you only have the cables you actually use in your PC (instead of all of them: non-modular), which eases cable management within the case a lot (at € 2,50 extra).

Hardware List

Thus we arrive at the following list:

Component Choice Low price (€)
Case Nanoxia Deep Silence 2 (also av. in dark gray and white)

93.00

Case Cooler Packaged with the case (2x)
Mother board ASRock Fatal1ty H87 Performance

91.45

Processor Intel Core i5 4670 Boxed (Haswell)

192.00

Processor Cooler Packaged with the processor
RAM memory Crucial Ballistix Tactical BLT2C4G3D1608ET3LX0CEU

72.50

Power supply Seasonic M12II 520W

56.00

Graphics Card Internal Graphics Processor
Hard disk Seagate Barracuda 7200.14 ST1000DM003, 1TB

53.50

DVD reader / writer Re-use
Wi-Fi Re-use
Bluetooth None
Keyboard Re-use
Mouse Re-use
Display(s) Re-use
Speakers Re-use
power strip (surge protected) Re-use
Windows Re-use
Hard disk for backup Re-use
Total

558.45

Prices tend to fluctuate, so the Total is an approximation. And yes, I admit this Total is a bit higher than the original intention :-).

Kids can optionally add various components such as a (single) powerful graphics card, multiple (two, three) 16:9 displays, advanced audio equipment, up to 32 GB of RAM memory, up to six hard disks (of any size), in a RAID configuration that supports performance or fidelity, or both, Bluetooth, an additional four cooling fans, etc. etc.

The proposed system is not suited for long-lasting extremely high performance, or for use with multiple graphics cards.